Quantcast
Channel: Citrix themes – JustAnotherCitrixBlog
Viewing all 57 articles
Browse latest View live

Pimping a website using NetScaler 10.5 (adding style, favicon, …)

$
0
0

I wanted to customise my blog, but I did not want to dig deep into wordpress. This seemed to much effort, and I don’t know if next update of WordPress would compromise my changes. I wanted to make permanent changes in a way that would survive any update. So I had to do it externally, in a quick and easy way, I had to do it using my NetScaler.

I had a look at the server response flowing through my NetScaler, I foud style definitions on top in the <head> </head> area.

I just wanted to change fonts and font colour. So where is it set? To be honest, I don’t know and it may change. Most important: It is in an external style sheet! So my NetScaler doesn’t have to touch this website but the style sheet.

I may override style definitions by simply specifying an additional style sheet after all the other style sheets. And this may be done by using NetScaler simply append a style definition in front of the </head> tag.

Programming the NetScaler to link to an additional external style definition

The NetScaler rewrite action

add rewrite action rw_act_addStyleSheet replace_all "http.res.body(1024)" q{"<link rel=\"stylesheet\" type=\"text/css\" href=\"http://www.norz.at/norz.css\"></head>"} -pattern q{</head>}

stylesheet_action
What does this action do?

It is a REPLACE_ALL rewrite action. It searches the first kB (1024B) of a http- response. It will put the string <link rel=”stylesheet” type=”text/css” href=”http://www.norz.at/norz.css”></head> on the found position. It searches for a pattern </head>.

I did not have to refine the search.

The NetScaler rewrite policy

I don’t want to search all pages, so I reduce on HTTP pages.

add rewrite policy rw_pol_addStyleSheet "HTTP.RES.HEADER(\"Content-Type\").contains(\"text/html\")" rw_act_addStyleSheet

stylesheet_policy

Programming the NetScaler to overwrite an internal style definition using a regular expression

add rewrite action res_act_css-replace_colour replace_all "http.res.body(204800)" "\"color: #802020;\"" -search "regex(re~\\scolor:\\s*#\\w{6}\\;~)"

replacecolour_act

What does this action do?

It is a REPLACE_ALL rewrite action. It searches the first 200kB (204800B) of a http- response. It will put the string color: #802020; on the found position. It searches for a regular expression \scolor\s*#\w{6}\; This regex should find strings like color: #123456

This regular expression means:

  • \s it starts with a space (to avoid mismatch with strings like frame.color)
  • color next will be a string color
  • \s* there may or may not be any space (space, tab, …)
  • # the character #
  • \w{6} there will be 6 characters or numbers (not a correct regex, this will be a-f and 0-9, but there is little chance for a mismatch)
  • \; is a ;

The NetScaler rewrite policy

Policy is similar to the one above

Programming the NetScaler to link to a favicon

The NetScaler rewrite action

add rewrite action res_act_insertfavicon replace_all "HTTP.RES.BODY(1024)" q{"<head><link rel=\"icon\" type=\"image/ico\" href=\"/favicon.ico\">"} -pattern "<head>"

replacecolour_act

What does this action do?

It is a REPLACE_ALL rewrite action. It searches the first 1kB (1024B) of a http- response. It will put the string <head><link rel="icon" type="image/ico" href="/favicon.ico"> on the found position. It searches for a string <head>

The NetScaler rewrite policy

Policy is similar to the one above

Binding the policies to my NetScaler’s load balancing virtual server

bind lb vserver lb_vsrv_blog.norz.at -policyName res_pol_insertfavicon -priority 16 -gotoPriorityExpression NEXT -type RESPONSE
bind lb vserver lb_vsrv_blog.norz.at -policyName rw_pol_css-replace_colour -priority 32 -gotoPriorityExpression NEXT -type RESPONSE
bind lb vserver lb_vsrv_blog.norz.at -policyName rw_pol_addStyleSheet -priority 48 -gotoPriorityExpression END -type RESPONSE

where2bind
Open the policy manager, select the corresponcing loadbalancing vServer (don’t bing policies like this globally, they’ll cause unwanted issues with other services later on).

bindingsDon’t forget to click NEXT if you bind these policies. Failing to do so will cause your NetScaler to skip all following policies as soon as the first policy matches!

I hope this helps!

best

Johannes


Add a certificate to NetScaler’s admin page

$
0
0

Usually the admin page is protected by a self signed certificate. So if you surf to your NetScaler using SSL (and you always should manage your NetScaler using SSL!!!) you’ll face a certificate warning.

Eventually you could consider this warning to be of no relevance. It is your NetScaler, your intimate friend, so why worry? True. There is no problem as long as your network is safe.

We all know there are security audits every now and then. And they won’t agree to the statement above. They’ll want to see secure communication to the management interface. Without any issues.

So let’s create a certificate. My NetScaler is 192.168.0.1, so I created a CSR for a host called 192.168.0.1. This does not exactly follow the RFC, but both, Microsoft CA and NetScaler don’t care about it. I created the certificate and added it to my NetScaler.

How to use a self signed certificate for NetScaler management

It took me some time to find out. It’s well hidden!

InternalServices
So we’ll open up this 192.168.0.1:443 service, add the newly created certificate.

This would be a perfect opportunity to disable SSL V3 and change cyphers to “TLS Only” or “high” cypher group. You may find advice here.

Disable insecure Management

Test if secure management is possible first! Also check the upgrade dialogue (this is still done using Java)

Open up System -> Network -> IPs

select your NetScaler IP and click edit; scroll down to the end and check secure access only.

Do the same with your Subnet IP.

I think it would be a good idea to deselect FTP and telnet too as this are no secure protocols and are not needed to manage a NetScaler. Deselect SNMP if you don’t need it.

Additional ways to protect management access

Well, if you click to Network -> ACLs you’ll find “extended ACLs”. You may deny all access to your NSIP and SNIPs and then allow certain ports and even limit access to certain management workstation’s IPs.

Have fun

Johannes

Hacking nsroot

$
0
0

Hacking nsroot on a NetScaler with default settings is completely easy!

I missed this one in Neil Spelling’s excellent blog about penetration testing NetScalers.

What do you need to hack a NetScaler if you forgot your nsroot password? An external authentication source.

How does NetScaler authentication work?

Well, NetScaler will use any authentication method configured and will check if the username / password pair fits to any authentication method (in order of bindings, lowest number is the highest priority). The last one will always be local authentication. This is done by aaad, the authentication demon.

You may watch this process by opening BSD shell and type cat /tmp/aaad.debug (see here)

If aaad is able to authenticate a user it will stop and return a message send_accept sending accept to kernel for : administrator

It will also return a set of groups if there are any. Next step, done by NetScaler itself, is the one we use to exploit the process:

NetScaler will try to find any object matching the user or one of it’s group memberships. So NetScaler will assume this user to be the same as a local user, if it is able to find a user with the same name.

So we got it. We open Active Directory and add an user called nsroot. We give it a password of our own choice. And we will be able to log on.

Panic!

How to fix this issue?

well, let’s open nsroot and disable external authentication. I don’t know why external authentication is enabled for this user, and I’d consider this to be a massive security issue

external_authentication

or simply: set system user nsroot -externalAuth Disabled (Danke Marco Zimmermann)

Have fun

Johannes

Replacing HTTP server related information using a NetScaler policy label

$
0
0

It may not be the strongest security measure, but many administrators are not quite sure about HTTP headers like Server or X-Powered-By. There seems to be just one reason why this header has to be in a HTTP response: It makes life easier for a hacker. So why not just remove it? Or even fake a false server? In fakt there is no technical need for this headers. We have a NetScaler, the ultimate magic HTTP box, so let’s do it!

I use this as an example. One of my students sent a message asking me how to invoke policy labels.

Replacing server headers may not be the big security profit expected: every (real) hacker will be able to recognise your server, just by using it. But it is a good example for NetScaler policy labels.

There are at least 3 policies to create:

add rewrite action wr_act_del_X-Powered-By delete_http_header X-Powered-By
add rewrite policy wr_pol_del_X-Powered-By true wr_act_del_X-Powered-By


rw_pol_remove_X-Powered-By

rw_act_remove_X-Powered-By

this will remove the X-Powered-By header.

add rewrite action rw_act_deleteServer delete_http_header Server
add rewrite policy rw_pol_deleteServer true rw_act_deleteServer

will delete the server header, and

add rewrite action rw_act_insert_server insert_http_header Server “\”whateverserveryoulike\””
rw_act_add_Server

add rewrite policy rw_pol_insertServer true rw_act_insert_server

will insert the fake header. (I did not take screen shots of all of them as this is very similar to X-Powered-By). Of course we may fake some more headers if we like. I just reduce to this 3 headers to keep things simple.

We than have to bind this policies globally to all our HTTP load balancers on our NetScaler.  I’m a lazy guy, so I prefer to avoid unnecessary work when ever possible. Policy labels may make work easier and faster, so I started to love them!

There is just one draw back about policy labels: you have to invoke them using a policy. There is no chance to invoke them in any other way. so I create a dummy policy:

add rewrite policy rw_pol_dummy true NOREWRITE

rw_pol_dummy

This policy will get used to invoke my NetScaler policy label.

So my next one will be creating the policy label.

add rewrite policylabel rw_label_serverinfo http_res

Policy_Label

bind rewrite policylabel rw_label_serverinfo rw_pol_deleteServer 100 NEXT
bind rewrite policylabel rw_label_serverinfo wr_pol_del_X-Powered-By 110 NEXT
bind rewrite policylabel rw_label_serverinfo rw_pol_insertServer 120 NEXT

Policy_Label2

Don’t forge these NEXT. Next will invoke the next following policy. Failing to do so will result in only the 1st policy being executed, the rest skipped!

And, last not least, we have to invoke this policy label.

bind rewrite global rw_pol_dummy 100 NEXT -type RES_DEFAULT -invoke policylabel rw_label_serverinfo

BildPolicyLabel

I hope this helps. And maybe you’ll very soon share my love for policy labels :-)

Enabling ECDHE ciphers in NetScaler 10.5

$
0
0

ECDHE Ciphers, this means, Elliptic curve Diffie–Hellman type of cyphers, add additional security to a NetScaler. If we want to use this kind of cyphers we need to create a DH key and enable curves.

Creating the key

The first thing to do is creating the key. This can be done from trafic management -> SSL

EDH-Key1

creating an ECDH-Key

give your key a name. DH paraeter size may be 512, 1024 or 2048. The smaller the key size, the less burden for your NetScaler, the larger it is the more secure. I have no preference for DH generator parameters. It takes some wile to create this key!

Enabling DH with a vServer

Diffie Hellmanhas to be enabled on a vServer.

ECDH-Parameters

Most important: Select Protocols. If you don’t need to support legacy OS like Internetexplorer on Windows XP (Androide up to 2.3.7, Java) you should disable SSL V3. Most modern OS support THL 1.2, however some don’t, so you may want to leave TLS v1 and 1.1 enabled, enable the most current one, TLS 1.2!

Enable DH. You may set up a refresh count, 0 means no refresh. Refreshing means recreating a DH key pair. Refresh is a burden for your NetScaler (especially for a VPX!), so don’t set this parameter too small; leave it to 0 if you’re concerned about CPU waste!

Select your DH key created before by browsing for it. They should be located in /nsconfig/ssl.

Enable DH Key Expire Size Limit. This will set the private key size to a proper value

Enabling curves

ECDH-curves
There is a set of 4 curves available with ECDH:

  • P_256
  • P_384
  • P_224 (not supported with TLS 1.2 on MPX)
  • P_521 (not supported with TLS 1.2 on MPX)

None of them is enabled. Click the + sign at the right side and enable curves. I usually enable all curves.

Selecting SSL cyphers for a vServer

Last not east you’ll have to select cyphers. The cyphers I selected are:

  • TLS1-ECDHE-RSA-AES256-SHA
  • TLS1.2-ECDHE-RSA-AES-256-SHA384
  • TLS1.2-ECDHE-RSA-AES256-GCM-SHA384
  • TLS1-AES-256-CBC-SHA

TLS1-AES-256-CBC-SHA is for backward compatibility only: it will be used if some client does not support ECDHE. This cypher suite does not support forward secrecy.

Setting up a NetScaler Gateway on NetScaler 11

$
0
0

It is quite easy to set up a NetScaler Gateway on NetScaler 11. It’s quite similar to NetScaler 10.5, but the wizard is much more powerful now! I’ll show you how to do it.

Prerequisites

I assume you have:

  • a certificate in place. This certificate should be a valid certificate created by a trusted certificate authority. If you don’t know how to get or create a certificate: there is an entry about this subject in my old blog
  • a LDAP and optionally a RADIUS policy to log on.
  • an IP address to be used for NetScaler Gateway inside your DMZ. This IP won’t be visible from outside, your fire wall will point an external IP to this internal one. This IP may be in use by an other load balancing vServer, however it must not be in use for SSL (or you may use a different port like 1443). I strongly recommend using a new IP for this!

Starting the NetScaler Gateway Wizard for XenApp and XenDesktop

We will start the brand new and shiny NetScaler Gateway Wizard. It’s located on the left side in the lower section.

NG11-1Splashscreen

Click Get Started

NG11-2StoreFront

We select StoreFront. We could also select WebInterface, if we would still use WebInterface (we should not do this as WebInterface is outdated).

Click Continue

NG11_Wiz2

  • Set an IP address for your NetScaler. This IP address will be the IP address of your NetScaler Gateway inside your DMZ.
  • Same with the port. The port defaults to 443, and there is hardly any reason to change it.
  • Select a name you like. Try to be not too funny, your boss will eventually see it some day :)
  • If you want to allow users just to connect to this gateway and let NetScaler redirect them to HTTPS you check this “Redirect …” checkbox and provide the FQDN users will use. In this example it will forward from http://gateway.norz.at to https://gateway.norz.at. NetScaler Gateway Wizard will create a load balancing vServer to do this. This server appears to be down. This is by design and is no issue!

Click Continue

NG11-4Certificate

Select your certificate. You could alternatively add a certificate now as shown in the next screen shot, but I strongly suggest installing it prior to running this wizard!

Click Continue

click Continue

NG11-4Certificate

Select your certificate. You could alternatively add a certificate now as shown in the next screen shot, but I strongly suggest installing it prior to running this wizard!

click Continue

NG11-5authentication

Next you’ll select the proper authentication method. In most cases this would be Microsoft Active Directory, a LDAP source from perspective of a NetScaler. You might also use a 2nd source for authentication (2 Factor authentication). In most cases this would be a RADIUS based authentication like RSA tokens or a SMS based method.

Be sure to put the 2nd Methode (RADIUS) on top. Doing so will prevent hackers causing an account lockout in Active Directory, as the 2nd Methode is not used if the 1st one fails!

click Continue

NG11-6StoreFront

This is a rather big one: It will set up our connection to StoreFront. It will do not only this but also install load balancing for StoreFront servers.

  • set the FQDN for your StoreFront service. This FQDN has to be resolvable from NetScaler.
  • the site path to your web store. It’s usually /Citrix/<store-name>web. Look into your StoreFront console to see it’s URL.
  • We authenticate to NetScaler Gateway using username and password only. However Active Directory needs to know the name of the domain desired. So we have to specify the name here.
  • The store name. The default store name is Store. Look into your StoreFront console to see the name of the desired store.
  • STAs: You may specify as many as you like. STAs store the internal IP address of the desired XenApp or XenDesktop resource, so it is not passed to the client but a so called STA ticked instead. You may ad as many as you like, but I’d suggest specifying at least two of them. You must not load balance STAs!
    Citrix usually suggests to use HTTPS for STA traffic, but it’s not mandatory as there is no confidential data in STA traffic.
  • StoreFront Server’ IP addresses have to be specified here. This is to create load a balancing vServer for StoreFront
  • The protocol in use may be HTTP or SSL (HTTPS). I strongly suggest using SSL as traffic to StoreFront contains user name and password in plain text!
  • The port in use. It’s usually 80 for HTTP or 443 for SSL
  • We may create a load balancing vServer for our StoreFront servers specified above. If you want this wizard to do so check the check box
  • The IP address for the load balancing vServer created to load balance our StoreFront servers

Click Continue

NG11-7XenDesktop

Last not least, let’s specify our XenDesktop farm. We could also specify a XenApp farm for XenApp versions up to 6.5.

  • The IP addresses of our XenApp servers
  • the port for the XML service (usually it’s port 80)
  • if we want to create a load balancing vServer we could check this checkbox and specify an IP address to be used for this. I would not do this inside your DMZ, so I skipped this

Click Continue

Now our Gateway is finished!


still some more work to be done!


Setting up StoreFront 3.0 for NetScaler 11

$
0
0

As soon as our NetScaler Gateway is up and running we need to set up StoreFront to use it. It’s more a kind of introducing the NetScaler Gateway to StoreFront. Other than WebInterface StoreFront is designed to use a NetScaler Gateway, so it’s a rather easy thing to do.

Enabling Pass-Through authentication from NetScaler Gateway

We open up StoreFront management console and click Authentication and select Add/Remove Methods on the right side.

SF_NG_Auth

We need to enable Pass-Through from NetScaler Gateway authentication. We can’t continue if we don’t!

Adding a NetScaler

Next step will be introducing our NetScaler to StoreFront, so it may be used by stores for remote access.

In StoreFront management console and click NetScaler Gateway and select Add NetScaler Gateway Appliance on the right side. A wizard opens.

SF_NG_introduce-NG

  • The name of our NetScaler Gateway is used in StoreFront only. You may choose the name you like best. Keep away from too funny or offending names, your boss may eventually see it 😉
  • We add the FQDN of our NetScaler Gateway (it’s important to use the FQDN, exactly the same spelling as used on our certificate, or our HDX session will fail to launch!)
  • The Subnet IP (SNIP) of your NetScaler Gateway. This is optional. You should not turn it on (following this post)
  • Logon type is usually Domain. We have strong authentication on NetScaler Gateway, so we don’t need 2 factor authentication on StoreFront. Domain credentials get passed from NetScaler Gateway to StoreFront, so users won’t have to add their credentials twice.
  • The Callback URL is an other optional parameter: the FQDN of the NetScaler Gateway. Again no point in skipping it. StoreFront contacts the NetScaler Gateway authentication service to verify that requests received from NetScaler Gateway. It’s mandatory if you use endpoint analysis scans on your Gateway and want to utilize these results in XenApp / XenDesktop to filter policies (“Citrix Smart Access”), as scann results are fetched from NetScaler Gateway during call back. It’s also used for session reliability.
    It may be difficult to connect from StoreFront to NetScaler Gateway. There is a Citrix White paper about it. It’s quite old but still valid.

Click Next

On next screen we have to set up STAs. The STA is a service inside the XML broker service and used to store the IP addresses of servers that will host the user’s session. It’s mandatory to have STAs for ICA proxy.

The XML broker service is located on every XenDesktop controller and every XenApp server for XenApp versions up to 6.5, so it’s nothing we have to install.

We have to use the same STAs in NetScaler Gateway, or we will run into trouble during the connection phase.

SF_NG_introduce-STA

  • We have to add STA servers. Citrix tends to encrypt all traffic using SSL, that’s why they suggest using SSL. In my opinion there is no serious content flowing too and from STA (just user name, application launched, the IP of the server responsible for this application too and a 32 byte random number, the STA ticket, back), so we don’t necessarily need to use SSL here.
    Of course we should use two STAs as one of them may become unavailable and the other one will take over.
    We should not load balance STAs (it would be possible here, but you must not do this on NetScaler Gateway or our sessions won’t launch!). So let’s just add two or more of our controllers here, they get load balanced by StoreFront servers. I always add the most preferred data collector here and one or more of the preferred ones in XenApp 6.5 or previous versions.
  • If we want to use session reliability we need to check this check box. Doing so will cause our STA tickets to remain inside the STA as long as our session lasts. Our client will be able to reconnect because of this.
  • Using two STAs at the same time will avoid reconnection issues if the original STA server is currently down during reconnection attempts. It’s not mandatory, however may be a benefit and is of hardly any costs (STA tables get longer, so it’s a bit of waist of RAM on controllers, we are talking about MBs, no GBs).

Click Create to finish.

Enabling remote access

Our Storefront server now knows about our NetScaler Gateway. We just have to allow our store to use it. An easy one to do:

In StoreFront management console and click Stores, highlight one of your stores (or your store if there is just one) and select Enable Remote Access on the right side. A wizard opens.

SF_NG_EnableRemoteAccess

  • Remote access should not use a Full VPN tunnel (this would not be HDX proxy mode or so called “micro VPN” but full VPN access!) but No VPN tunnel. If you want to use a full VPN you don’t have to do anything within StoreFront as this is local LAN access as soon as you are connected to your VPN. However you would have to roll out VPN clients and VPNs are considered to be less secure than HDX proxy.
  • Select your NetScaler Gateway.

Click Okay to finish.

Managing beacons

A beacon is an intentionally conspicuous device designed to attract attention to a specific location (Wikipedia).

We use our beacons to decide if our client is inside our LAN or on the internet. This will allow mobile clients to roam from extern to intern and vice versa without the need of reconfiguration. It only works with Citrix Receiver, it won’t work if you use a browser.

Citrix receiver will immediately try to connect to internal and external beacons if it gets started.

  • If our client is inside of our LAN (so it can connect to the internal beacon, we don’t care about external ones) we will skip the NetScaler Gateway and directly connect to StoreFront. We will use one of StoreFront’s authentication methods (instead of NetScaler authentication) such as one factor domain authentication or domain pass-through authentication. Our Citrix Receiver will directly connect to the designated remote session host or virtual desktop.
  • If the client is on the internet (so it can not connect to the internal, but to at least one of our external beacons) we will connect to NetScaler Gateway.
  • If none of the beacons may get reached our client won’t try to connect and the user will see an error message if he tries to launch an application.

SF_NG_Beacons

  • Internal beacon: It defaults to Use the service URL. This is the base URL displayed (and managed) in StoreFront management console (click Server Group to see it).
    The receiver will just do a HTTP (HTTPS) connection there (it will send a HEAD / command). You will have to change it if there is a HTTP service available on the internet for this URL. Specify a different beacon address in case.
  • There is no guide line for Extrenal beacons. They default to your NetScaler Gateway and http://www.citrix.com. You may use which ever web servers you like. Select highly available ones!

Preparing Citrix NetScaler 11 integrated Caching for Front End Optimization

$
0
0

Front End Optimization on a Citrix NetScaler will only work, if caching is set up correctly. This is especially true for image optimization. Usually it’s caching to blame for if image optimization does not work. So what to do?

Citrix tells us (edocs.citrix.com):

Front end optimization requires the NetScaler integrated caching feature to be enabled. Additionally, you must perform the following integrated caching configurations:

  • Allocate cache memory.
  • Set the maximum response size and memory limit for a default cache content group.

There is even more, not mentioned here: We need to enable caching for both, service and virtual server.

So how to do this?

Allocate cache memory

Caching1

Click Optimization -> Integrated Caching and select Change cache settings.

Caching2

Set a memory limit (set it huge enough, 100 MB may not be enough for a professional website! All optimized pictures need to fit into it) and click OK.

Set the maximum response size and memory limit for a default cache content group

this one may get skipped for the first try: It’s already set correctly. I add 2 screen shots, what to do …

Caching5

Caching6

Turn on integrated caching for a service

Caching has to be enabled on every service. To do so we select a service and click edit.

Caching3

Maybe you will have to click on more to see and click cachable

Turn on integrated caching for a virtual server

Caching5

Caching6

Add Traffic Settings, and enable caching.


Of course there is a blog about Citrix NetScaler 11 Front End Optimization too.


Changing my Citrix NetScaler VPX based website from http to https and scoring an A+ in SSL labs test

$
0
0

NetScaler_SSL_Labs_A_blog.Norz.at
Citrix NetScaler load balancing and content switching servers will only score an C in quality labs SSL test, no matter if you use a VPX, MPX or SDX. There are several reasons for this. You could probably say, Citrix is to be blamed for this, but I don’t agree: It’s the end users to be blamed. They don’t upgrade their browsers, and can’t benefit of new encryption methods; because of this we can’t just go for security! We have to consider compatibility too.

This blog is based on an excellent blog by Steven Wright in Citrix Blogs. I have an other blog about scoring an A+ on NetScaler Gateway (Unified Gateway). The other one is a bit less informative …

This blog tries to tell you what to do and which compatibility issues you might face …

So, what does it take to score an A+ in a NetScaler?

there are several things to be done:

  1. Use an SHA2 certificate
  2. Disable SSL v2, v3 and probably also TLS v1 and v1.1 (this will score a B)
  3. Create a cypher set including just secure cyphers (this will score an A-)
  4. Enable Diffie-Hellman key exchange (this will score an A)
  5. Add a strict-transport-security header into the server response (this will score an A+)

Let’s give it a try!

I set up a new content switching server for https://blog.norz.at. I test it using Quality labs SSL test

NG_ssl-labs1

To be honest: this is a disaster!

1 Use a SHA2 or better certificate

There is not much to say. SHA 1 certificates should not be available any more. Current standards are SHA 2 and SHA3. If you currently use a SHA1 certificate handle it back, your CA will usually update it for free as SHA1 certificates are no more supported by all browsers.

2. Disable SSL v2, v3 and probably also TLS v1 and v1.1 (score of B!)

This is an easy one. Open your virtual Server and locate SSL parameters. Deselect SSLv3 (and probably TLSv1 and TLSv1.1 as well, depending on clients you have to support)

NG_ssl-new

commanl line:

set ssl vserver cs_ssl_webserver -ssl3 DISABLED

optional we could also append -tls1 DISABLED -tls11 DISABLED to disable TLSv1 and TLS v1.1

Following clients need to use SSL v.3:

  • Windows XP with Internetexplorer 6

Following clients will only support TLS 1.0:

  • Android up to Jelly Bean (4.3)
  • search engine Baidu (it’s important if you publish MP3 files!)
  • Windows up to Vista, Windows 7 with Internet Explorer 10 or before
  • Windows Phone 8 with internet explorer 10
  • Java up to 8u31
  • Open SSL 0.9.8 and before
  • Mac OS X 10.8

(source: SSLlabs)

2 a. An other requirement (just check)

Check advanced SSL settings (Traffic management -> SSP, its on the right side, down): Deny SSL Renegotiation hould be set to Frontend Client or non secure

NG_ssl-labs2

not too bad. But not really good either. The most important sentence here is: This server accepts the RC4 cipher, which is weak. Grade capped to B.

3. Create a cypher set including just secure cyphers (this will score a A-)

You could copy default cyphers and remove all these RC4 ones. This will be the most flexible solution. And you’d be able to connect from every country, no matter which one.

What about the last sentence? “From every country”? Umpf. There is an attack to SSL, it’s rather hard to do, but highly efficient: During session establishment a client will offer connection methods, and a server will select the best one this server supports. To do so you need to control a core router. Some governmental organizations exactly do this. I’m traveling a lot. I have seen weak encryption in some countries.

Which cyphers do we need as a minimum requirement? Just the best ones supported by clients, if we go for security. SSL Labs helps: These are the cyphers actually used:

TLS_ECDHE_RSA_WITH_AES_256_CBC_SHA (0xc014)   ECDH secp256r1 (eq. 3072 bits RSA)   FS 256 Bt
TLS_ECDHE_RSA_WITH_AES_128_CBC_SHA (0xc013)   ECDH secp256r1 (eq. 3072 bits RSA)   FS 128 Bt
TLS_DHE_RSA_WITH_AES_256_CBC_SHA (0x39)   DH 2048 bits   FS 256 Bt
TLS_DHE_RSA_WITH_AES_128_CBC_SHA (0x33)   DH 2048 bits   FS 128 Bt
TLS_RSA_WITH_AES_256_CBC_SHA (0x35) 256 Bt
TLS_RSA_WITH_AES_128_CBC_SHA (0x2f) 128 Bt
TLS_RSA_WITH_3DES_EDE_CBC_SHA (0xa) 112 Bt

So we create a cypher suite containing just these cyphers! If we take a closer look we see which cyphers will get used by which browser; actually only some of these cyphers are used!

But stopp: there is something else to say:

  • These TLS_DHE_RSA_WITH_AES_*_CBC_SHA (0x33)   suites are never used. So we may skip these.
  • TLS_RSA_WITH_3DES_EDE_CBC_SHA is a really weak one (112 Bit!!!), and it’s only used by Windows XP boxes. You should remove it if you don’t need to support XP boxes
  • TLS_ECDHE_RSA_WITH_AES_128_CBC_SHA is just used by Java and Apple’s iOS 9
  • TLS_RSA_WITH_AES_128_CBC_SHA  is used by Android up to 2.3.7 only. You may skip it if you don’t have to support Gingerbread.

If you only support TLS_ECDHE_RSA_WITH_AES_256_CBC_SHA you will be able to connect using Android beginning with Ice Cream Sandwich (4.x), Widows beginning with Vista, Windows Phone, Open SSL from 0.9 and 1.0.1 but not 1.0.2, Mac OS X from 10.6.8, iOS from 6.0.1 (available for iPhone from 3GS)

So how to do it? in Traffic Management -> SSL -> Cipher group create a new cipher group and add the desired ciphers into it.

If you use the GUI be careful to add ciphers in the correct order as the GUI does not allow to change priorities: the first cipher you add rill get a priority of 1, the second one of 2 …

NG_SSL-cyphers

command line:

add ssl cipher JustSecureCyphers

bind ssl cipher JustSecureCyphers -cipherName TLS1-ECDHE-RSA-AES256-SHA -cipherPriority 1
bind ssl cipher JustSecureCyphers -cipherName TLS1-ECDHE-RSA-AES128-SHA -cipherPriority 2
bind ssl cipher JustSecureCyphers -cipherName TLS1-DHE-RSA-AES-256-CBC-SHA -cipherPriority 3
bind ssl cipher JustSecureCyphers -cipherName TLS1-DHE-RSA-AES-128-CBC-SHA -cipherPriority 4
bind ssl cipher JustSecureCyphers -cipherName TLS1-AES-256-CBC-SHA -cipherPriority 5
bind ssl cipher JustSecureCyphers -cipherName TLS1-AES-128-CBC-SHA -cipherPriority 6
bind ssl cipher JustSecureCyphers -cipherName SSL3-DES-CBC3-SHA -cipherPriority 7

bind ssl vserver cs_ssl_webserver -cipherName JustSecureCyphers

NG_ssl-labs3

In my opinion an A- is a good result for a NetScaler, but it’s easy to score better (and better things are always the main enemy of good ones). So let’s continue: The most important sentence here is: “The server does not support forward secrecy with the reference browsers. Grade reduced to A-”

So it’s about forward secrecy.

4. Enable Diffie-Hellman key exchange (this will score an A)

There is a blog about this. I have written it about NetScaler Gateway, but it’s also valide for a load balancing or a content switching server..

Why is it important? It’s all about forward secrecy. What’s forward secrecy about? The word itself sounds a bit funny but highly mysterious. Well, it’s all about the private key. If I record sessions (e.g. during network traces) I will be able to decrypt it using the server’s private key. This is not desired as we will never know if the server’s private key will get stolen in future (that’s why we call it forward secrecy).

Let’s have a look at SSL session establishment: During the second part (“Change Cipher Spec”) the client will create a secret for a symmetric encryption and send it to the server. To keep it a secret we can’t send it in an unencrypted way, so we encrypt it using the public key of the server (contained in server’s certificate). If you steal the private key of the server (in NetScaler stored in /flash/nsconfig/ssl) you’ll be able to decrypt it and therefore decrypt all the communication following.

We avoid this by using Diffie-Hellman key exchange. Cyphers supporting Diffie-Hellman will always contain a DH in their names. TLS_ECDHE_RSA_WITH_AES_256_CBC_SHA is one of them. That’s why Quality SSL labs marks this cypher with FS, meaning forward secrecy.

Quality_Labs_A

Oh, God, my score up to A! That nasty – vanished. But is an A good enough? Isn’t there an A+ also?

5. Add a strict-transport-security header into the server response (this will score an A+)

So, to be absolutely clear: B was fine, A- was great, an A is a top rating. But it’s more or less easy to score an A+, it’s just an additional header, strict-transport-security with a content of max-age= and a number (in seconds). this header can be inserted easily using a NetScaler rewriting policy. What is this good for? Simple like that: It’s a request to client’s browser to not use anything else but SSL in communication with this very server for a certain time, even if there are http- links in it. This would protect communication from down grade attacks. down grade to HTTP, and therefore to a non secure communication. This header follows RFC 6797 and was introduced in 2012.

The policy:

If you apply this policy to a content switching server make sure there is no policy bound to a load balancing server with a goto end!

the first thing to do is creating the action:

enforceSTS-Action

So you see, this is a NetScaler rewriting action (Appexpert -> rewrite -> actions) of type INSERT_HTTP_HEADER. The header name has to be Strict-Transport-Security, and the value max-age=

If you want to include sub domains you should also specify the includeSubDomains parameter

commandline:

add rewrite action rw_act_insert_STS_header insert_http_header Strict-Transport-Security "\"max-age=157680000\""

Next the policy

enforceSTS-Policy

hm. I just filtered using a true value. If you want to allow for non- SSL connection in addition you would rather filter on something like CLIENT.SSL.IS_SSL

Commandline:

add rewrite policy rw_pol_enforce_STS true rw_act_insert_STS_header

add rewrite policy rw_pol_enforce_STS CLIENT.SSL.IS_SSL rw_act_insert_STS_header

Bind this policy to your web server!

NetScaler_SSL_Labs_A_blog.Norz.at

This looks really great!!! A score of more than 95% using a NetScaler VPX! What does A+ mean? Exceptional!


Credits: Thanks to Stephen wright (Citrix) for his great entry at Citrix blogs


I would be more than just glad to see some feedback if you like it, or get annotations if you see some mistakes. Security is always work in progress, so go ahead and tell me about your thoughts!

Protect a DNS server using a Citrix NetScaler

$
0
0

Recently I found out: DNS is a big bandwidth waster on my internet connection. Strange, isn’t it? DNS? So I started a network trace on my firewall: someone is abusing one of my DNS servers. I guess it’s a kind of malware using my DNS server, but I am not really sure. The domain was X99MOYU.NET belonging to a Chinese company called ZhuHai NaiSiNiKe.. Content of the website is not available (403, Access Denied).

My first idea was to reply with 127.0.0.1 as a DNS response. So I created a zone for this domain and added records. However they kept sending billions of queries.

Next step was: hiding my DNS server behind a Citrix NetScaler. Now all queries have to traverse my NetScaler. Easy like that: I created a DNS load balancing virtual server and my external IPs point there. Next step: Bind a responder policy to it.

I created a responder policy dropping all queries to domains not hosted in my environment. I did this using a NetScaler pattern-set (as pattern-sets are more efficient and easier to read than endless complex expressions combined with or like:
!DNS.REQ.QUESTION.DOMAIN.CONTAINS(“norz.at”) || !DNS.REQ.QUESTION.DOMAIN.CONTAINS(“norz.cc”) || …)

DNS-Policy

patternSet

command line:

add policy patset MyDomains
bind policy patset MyDomains norz.co -index 1
bind policy patset MyDomains norz.at -index 2
add responder policy res_pol_dns_invalid_request "!DNS.REQ.QUESTION.DOMAIN.CONTAINS_ANY(\"MyDomains\")" DROP

My pattern set is called MyDomains. So this policy will get applied (and drop the request) if the DNS query is for a server not contained in MyDomains.

MyDomains contains all domains I host like norz.at, norz.cc, …

Next problem: I opened up my load balancing vServer and wanted to bind a responder policy. Strange, no chance to bind a responder policy!

bind_policy

command line:

I had to go back to my policy, start the policy manager and bind it. Of course I could have bound it using command line as well :-)

bind lb vserver lb_vSvc_DNS -policyName res_pol_dns_invalid_request -priority 100 -gotoPriorityExpression END -type REQUEST

I hope you like it and would be glad to hear some commands about the subject …

Splitting up a NetScaler site using admin partitions

$
0
0

(a nice but partly failed try)

Complex web applications may lead to complex NetScaler configuration. And sometimes an administrator may get lost troubleshooting complex websites, especially sites using content switching.

This is an example of a real world website: The portal page is assembled of several independent web applications. Each application is hosted on a specific group of load balanced servers. There are rewriting policies replacing some content on a website, there are also rewriting policies on a global base (and responders, URL transformation, FEO optimization, app firewall, caching, …). Some of the global and some of the server specific content, was not replaced like desired, but some content gets replaced. The current configuration is confusing the admins, and it also confused me.

Main problem here: I can’t look into traffic between a content switching and a load balancing vServer, so I can’t see what’s actually going on in here. Second problem: there is a total of 800 rewriting policies. That’s confusing me, there are too many for me, I can’t keep track of all these policies, I simply don’t remember what they are good for and where they got bound too!

The current solution also used NetScaler MAC based forwarding, but MAC based forwarding had partly undesired influence on some of the load balancing vServers, and on the NetScaler as a hole as it blows up the TCP connection tables (by adding MAC addresses to it).

That’s where admin partition came in my focus!

We got admin partitions in NetScaler 11 (10.5e), a possibility to split up a NetScaler into several “virtual” ones. That’s great. I made up my mind to put each load balancing server into a specific admin partitions while I let the content switching vServer in the default (root) partition.

This is a sketch of solution I desired:

Lay_Out

The first big problem I faced: two partitions can’t connect into the same subnet. This had been a must have as I would not have been able to change the current networking and routing configuration in a 10,000+ server data centre without an excessive change process lasting for several month. So we stopped here, almost a year ago.

The new version 11.1 offers a feature called partition shared vLan; this seemed to be the solution! So I tried to set up vLan 1 as Partition shared vLan. This was impossible. I guess, vLan 1 is not a real vLan at all. It’s not comparable to the rest of vLans, but I actually don’t really know.

But I could create a vLan, make it a Partition shared vLan, and bind it to the interface.

Creating vLans

vLan2

add vLan 1000 -sharing ENABLED -aliasName PartitionShared_vLan

(so we add vLan 1000 with partition sharing enabled. You may skip the alias name, but I always like to add some documentation)

bind vlan 1000 -ifnum 1/2

(we bind this vLan to the designated interface)

Next step: Let’s create the partitions

createPartition

add partition WebServerApp1

(This partition will be used for a webserver of app1, so I’ll call it WebServerApp1)

Open this partition, scroll down to network isolation, click add binding and select vLan 1000

Partition2

click on VLANS

vLan3

and bind vLan 1000

bind partition WebServer -vlan 1000
Currently you can’t unbind vLan 1.

I repeat this step for all admin partitions desired. Now I can put all of my load balancing servers into dedicated admin partitions.

Currently there are several restrictions about NetScaler basic and advanced features in admin partitions:

Restrictions about admin partitions in NetScaler 11.1 build 48.10

default partition Admin partition
SSL Offloading SSL Offloading
Load Balancing Load Balancing
Content Filter
Rewrite Rewrite
Authentication, Authorization, Auditing
HTTP compression HTTP compression
Content Switch Content Switch
Integrated Caching Integrated Caching
NetScaler Gateway
Application Firewall
Surge Protection
Priority Queuing
Cache Redirection
Web Logging Web Logging
RIP Routing RIP Routing
IPv6 Protocol Translation IPv6 Protocol Translation
EdgeSight Monitoring (HTML Injection) EdgeSight Monitoring (HTML Injection)
AppFlow AppFlow
ISIS Routing ISIS Routing
AppQoE AppQoE
Content Accelerator Content Accelerator
vPath vPath
Reputation
Sure Connect
Http Dos Protection
Global Server Load Balancing
OSPF Routing OSPF Routing
BGP Routing BGP Routing
Responder Responder
NetScaler Push NetScaler Push
Cloud Bridge
Callhome Callhome
Front End Optimization  (missing in GUI)
Large Scale NAT Large Scale NAT
RDP Proxy RDP Proxy
RISE Integration

A comparison of features may be found here. (Thanks, Balaji, to provide this link)

So there are currently serious ones missing in admin partitions! I highlighted some I was interested in. To me the ones I miss most are App Firewall and Front End Optimization. I would have put this into admin partitions, as this is done on a per application base. I don’t miss Surge Protection, Http Dos Protection and Priority Queuing as this is done during connect on the content switching vServer.

This project does not use NetScaler Gateway. So NetScaler Gateway missing is no problem for me, however I missed the chance to isolate NetScaler Gateway in many other projects. NetScaler Gateway is usually governed by other departments, so it should be in a separate admin partition. Our beloved NetScaler will degenerate into a battle ground between the application delivery and the network group, if we can’t completely isolate it.

I suddenly faced a strange problem (why did it not work?):

Simple: I could not communicate from default partition to WebServerApp1 admin partition. It was a completely impossible thing to do. I tried to send ICMP packets from default to WebServerApp1 admin partition, but without success. Even ARP didn’t work at all.

I started monitoring, both from NetScaler using NSTrace and from a switch board (an other restriction here: NSTrace is only available from command line inside an admin partition, it does not exist in GUI).

I set up a switch board for monitoring. Pinging from default partition to 10.0.1.10 (the vServer inside the admin partition), I saw ARP requests going out of NetScaler, but no ARP replies coming back from the admin partition. Same the other way round. However I could ping all IPs from both partitions from an external server (i.e. 10.0.1.100) and vice versa. My networking problems seem to be internal to NetScaler only.

I added a static ARP entry into default partition for 10.0.1.10 and 10.0.1.1 into the WebServerApp1 partition and tried again. No success.

Sending packets between admin partitions is currently not possible!

I also added virtual MAC addresses to the partition. No success either. There is something spooky going on inside a NetScaler’s internal networking logic making admin partition to admin partition traffic an impossible thing to do.

My current work around is a router VM based on VyOS. I could fix all of my problems by now, I love my deployment, but I hate this tiny little VM: it should simply not be there!

Comments (and a possible solution) are highly welcome …

Binding many NetScaler Gateways to a content switching vServer on Citrix NetScaler

$
0
0

Or: The power of the ANY service type

This is a work around for a well-known problem in NetScaler: Binding NetScaler Gateways to content switching vServers.

This solution does not follow Citrix best practices. Avoid using it, if you can!

My solution will work with NetScaler 10 upward. I didn’t test with 9.x as they are not considered to be secure any more.

The Problem

Up to 11.0 it was impossible to bind a NetSaler Gateway to a Content Switching vServer. By now (firmware versions 11.1) this is limited to a single NetScaler Gateway. This limitation may be an obstacle to overcome in certain environments. Most companies nowadays suffer under a lack of public IPs. But mos of all: Users don’t like complex environments with tons of different URLs to handle, one for mobile devices, one for PCs, one for trusted, one for untrusted devices and so on. Instead they want to use a single URL for all use cases.

Content switching may mitigate this issue by hiding very different configurations behind a single URL. But this is not true for NetScaler Gateways. In days of old we could not bind any gateway to a content switching vServer at all, now (starting from version 11) we can bind a maximum of one gateway to it.

Why may one gateway not be enough? First of all, it is complexity. It may confuse you if you have to bind tons of different scenarios to one gateway. In my real world experience I see often buggy environments being buggy, as complexity may over work the admins. But there may also be technical reasons. One of my costumer would have to bind round about 50 LDAP sources of costumers and partners. All of them are geographical dispersed and some of them may even be misconfigured and therefore slow. Logon to the last ADs in the list would be painful. Splitting the gateway up into some gateways would speed up things very much.

The solution

This question came up in one of my NetScaler classes. We set up all needed NetScaler Gateways. They are addressable and use private addresses of a separate address space (this address space does not exist outside of NetScaler).

We set up a content switching vServer. I would prefer a SSL-bridge to avoid SSL offloading, however we needed something to base content switching on, so we used a SSL vServer. This is far from being a perfect solution, but it works.

How to bind them together?

My first thought was: pointing the services of the load balancing vServer to the NetScaler gateways. But this does not work, we faced an error stating this IP address is already in use.

That’s my trick: I create load balancing vServers of type ANY and point its services to the corresponding gateways. That’s why these gateway servers use private addresses that don’t exist in your environment. This traffic will never leave this NetScaler.

^NetScaler CS-Vserver loadbalancing many NetScaler Gateways

(graphic by courtesy of Andre Buck)

What’s wrong about this setup?

It does not follow Citrix best practices. So you should avoid using it. On the other hand: everything we do is fully supported: The content switching vServer, the load balancing vServers bound to it, load balancing vServers of type any, and last, not least, the gateways.

We won’t be able to log on to the NetScaler Gateways using smart cards (certificate based logon), if we use SSL-Offloading lb vServers, as these certificates won’t be visible to the NetScaler Gateway.

Why would you use it even though?

It’s currently the only chance to bind more than one NetScaler Gateway to a content switching vServer on a NetScaler.

Citrix NetScaler SD-WAN?

$
0
0

I recently was asked to teach Citrix SD-WAN. My first thought was: wtf? I asked Google, and Google, knowing everything, spoke to me in infinite wisdom: Citrix SD-WAN’s previous name is Branch Repeater. And Branch Repeater, I did already know this, once was the new name for WanScaler (a product I have been certified on, but never used in real life). Meanwhile the product got rebranded again and is now called Citrix NetScaler SD-WAN. So it is just a rebranded product?

WanScaler once was a great product, caching WAN traffic, and thereby preventing content from traversing a WAN multiple times. “Compression rates” of 1:100,000 had been possible, would probably still be possible, if … Yes, if we nowadays would not encrypt everything. Caching and encryption don’t go together well, never did and will never ever do. That’s why I didn’t recently hear much about WanScaler or CloudBridge. It has its reason to exist, mainly in ICA environment, but never got a big success.

But I do what people want me to do, so I started reading into it. I built my own test environment consistng of 2 SD-WANs, 2 WanEms, a server and a client. And found absolutely thrilling information! It is not just a 3rd re-branding of a product of very limited area of application, instead it is a brand new approach to WAN: Software Defined WAN, SD-WAN.

There are two different types of appliances: These classical WanScalers, Repeaters, which ever name you want to use, and this brand new type of software defined WAN. And, in addition, and a blended version, called NetScaler SD-WAN enterprise of course, worth thinking about it!

What’s so totally new about it?

I will just focus on software defined WAN. SD-Wan nowadays is a hype. Gartner says:

By end of 2019, 30% of enterprises will use SD-WAN products in all their branches, up from less than 1% today.

That’s an ambitious prognosis! And Citrix is right here, one of just 5 solutions currently on the market. Gartner:

Organisations looking for WAN optimization or dynamic selection capabilities should consider this vendor, especially when Citrix applications are also present

What means: dynamic selection capabilities?

It’s all about finding out, where to send packets too. Still not clear?

Current deployments:

Usually we have a MPLS connection to branches. MPLS is fast, has low jitter and is reliable, guaranteed SLAs of 99,9% are usual (this means: less than 1 hour down per month), in real life European SLAs will be even much higher. It’s very common to bundle MPLS with a GSM LTE or GSM G4 connection in active passive, as a last mile outage due to construction works is a very likely thing to happen. This will result in a SLA of 99,999%, meaning: 5 minutes down time per year. In addition we usually also have Internet connections (with much lover SLAs of about 98-99%) in place.
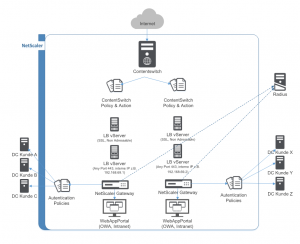
Citrix NetScaler SD-WAN

Citrix NetScaler SD-WAN

What’s wrong about it?

Simple like hat: we have 3 connections, one costly, one moderate and one cheap. And we only use the costly one for WAN transfer. If we need to upgrade (Gartner speaks about 15% increase of WAN traffic per year, so there are upgrades coming up), we need to upgrade the most costly one. It’s a damn expensive solution.

Can we make things better?

Yes we can! SD-WAN would be a solution allowing all this 3 connections to be used at the same time. You think about link load balancing? You’re totally wrong! Keep on reading.

A Citrix NetScaler SD-WAN is a virtual WAN solution. Tracerouting your WAN from inside, you would just see a single hop, not two of them, so it’s technicaly to be considered as a tunnel. It’s a tunnel, aggregating of all this three connections. But the really important thing is: it’s a UDP based tunnel using port UDP 4980.

What’s great about an UDP based tunnel? It’s just a less reliable tunnel, isn’t it?

Yes and no. UDP is not reliable at all. That’s true. But UDP does not have connections at all. No sequence numbers, no acknowledgement numbers. If we need reliability, we have to add it on a higher layer. However using a stateless protocol, we can send one packet of a single TCP connection on MPLS, the next one on GSM. Even more: the packet and its acknowledge don’t even need to use the same connection. And it’s easy to avoid a congestion, because we can dynamically swerve a line if quality of this connection is decreasing.

And that’s what it is: We have a tunnel between data centre and branch office. And the tunnel intelligently and dynamically selects the best matching connection for a certain kind of traffic. We can hardly predict where a packet would flow. Its policy based, so we can assign certain requirements about quality for each kind of traffic.

Which connection is the best one?

It depends (this is the universal answer for every architect to all kind of questions).

Think about ICA? It’s the least latency one. User experience is very sensitive about latency. Jitter? We don’t care much about it, as long as we can keep latency below a certain value.

SIP (VOIP telephony)? Latency is not a big issue. Latency above a certain amount will make our phone calls less interactive, but everything below 300ms would be fine. Instead its jitter we have to care about. Jitter would distort spoken words, so they are harder to understand. And we are concerned about packet loss of course, as packet loss has an even stronger impact on understandability than jitter.

Videos? Well, neither of them is a problem, as we usually buffer videos. Even packet loss is usually not a big problem, as long as it doesn’t exceed a certain value. Instead its mere bandwidth. Videos nowadays fill up our costly WAN links causing congestion and packet loss.

File transfer? During browsing of directories, latency certainly is an issue, but this is not true about up- or download of files. WanScalers always had their method to deal with this latency issues, and it didn’t disappear in enterprise version. Again, it’s just bandwidth. However we would prioritize it a bit higher than video as less speed immediately impacts user experience.

So every type of connection has its own, very special, requirements. Pure prioritization won’t be sufficient.

All our Connections are pooled into the so called SD-WAN network. Our NetScaler SD-WAN Box will continuously monitor all possible connections and select the one best matching for every TCP stream, even for every single TCP packet. And even more: We have no need for symmetry. We could send an ICA packet on MPLS while we get the acknowledge packet over the internet! So asymmetric connections (like ADSL or cable TV) are an issue no more.

I did a short survey with my costumers: SIP traffic is not increasing very much. ICA traffic is increasing slowly while bulk traffic, mainly HTTP and videos, is exploding. Gartner calculates with annual growth of 15% continuing until 2019. So why upgrade our expensive MPLS connections and not use cheap internet instead?

Security

Sending data over the internet is a risky thing. Citrix NetScaler SD-WAN uses 256 BIT AES SSL encryption, or IPSec of similar security if you prefer. No data will traverse the internet in an unencrypted way. The crypto library supports NSA Suite B, I think, this is sufficient.

There is another aspect. If I want to hack into a connection, I need to pick up every single packet of this very data stream. I face dramatically more overhead if a single packet is missing. How can I collect all packets, if packets are distributed randomly over several very different connections, provided by different providers? This would even be challenging for these intelligence services all over the world! How could they ever reassemble a TCP stream? In my opinion this is a strong plus on security, even over MPLS.

Resilience

We measure the quality of a connection several times per second. If we see any parameter changing (latency, jitter, congestion, bandwidth) we will immediately change our assessment. Internet can have both, less latency and less jitter than MPLS. But it might change within milliseconds. It’ important to react. SD-WAN does immediately!

SIP (VOIP) is very sensitive to both, packet loss and jitter. At the same time it’s not a top bandwidth waster. We could therefore easily duplicate data over two or more lines and send it simultaneously. The data arriving first will be forwarded to the user, the other packets will be discarded. This would reduce the risk of packet loss and, at the same time, reduce both jitter and latency. This is an other great feature of Citrix NetScaler SD-WAN. Isn’t it a great chance for our VOIP calls?

There is a great Video on YouTube about resilence. It’s a marketing video, but I like it, as it truly shows how it works.

More chances to safe costs

We currently use MPLS because it is secure, available and offers guaranteed SLAs. Using Citrix NetScaler SD-WAN we don’t need to care about security as it’s built into SD-WAN. However SLAs of internet connections are not on top. What about using three internet connections at the same time. Three connections using very different technology like a GSM based, a cable based and a DSL based connection, instead of MPLS? This would offer SLAs above MPLS and, at the same time, be less costly? I think, evaluating this would be worthwhile!

Links

I have spoken to guys from Danish government evaluating Citrix NetScaler SD-WAN, some weeks ago. They are very interested in SD-WAN, mainly as they already have a department using Citrix NetScaler SD-WAN: Danish AgriFish. It’s all about costs and random disruption of ICA connections, and it works perfectly well. AgriFish is enthusiastic about it, other governmental authorities will follow. I link this (Citrix) success story here. I’m sceptic about success stories (never trust statistics you didn’t fake yourselves, but I could prove this AgriFish one, so I trust in it!
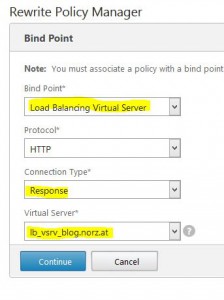
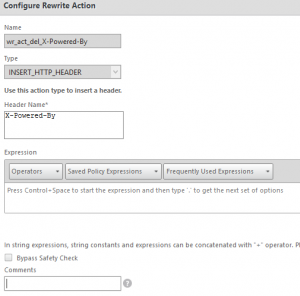
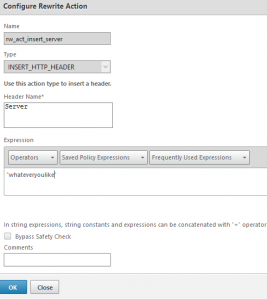
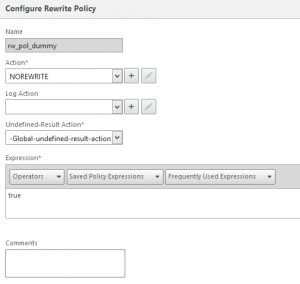
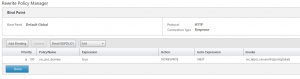
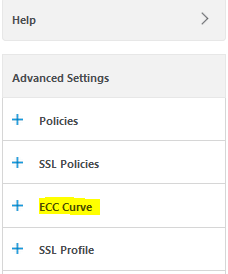
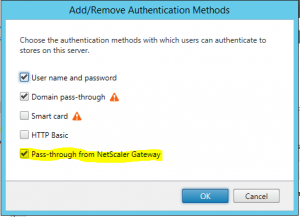
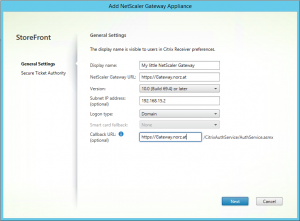
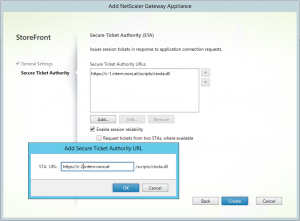
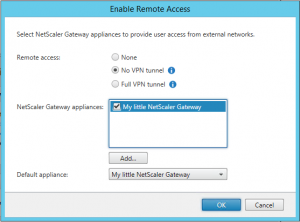
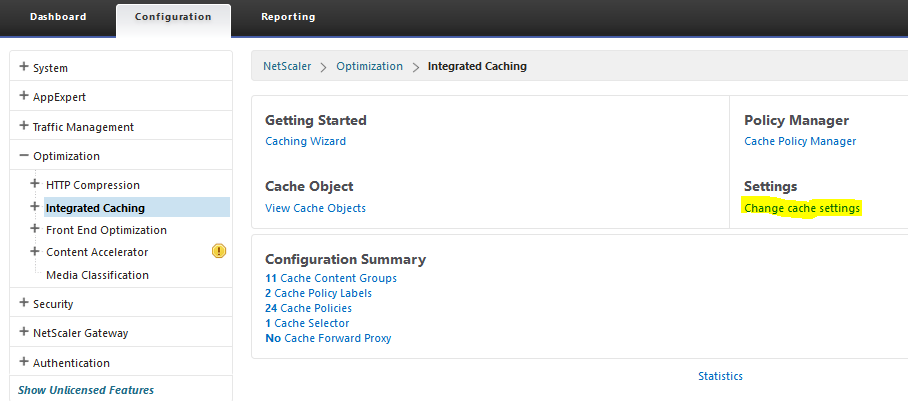
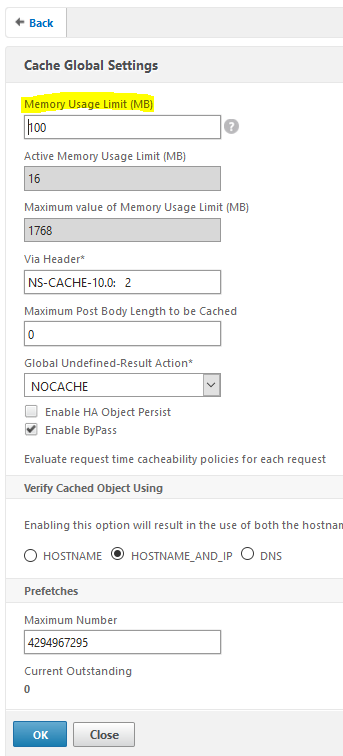
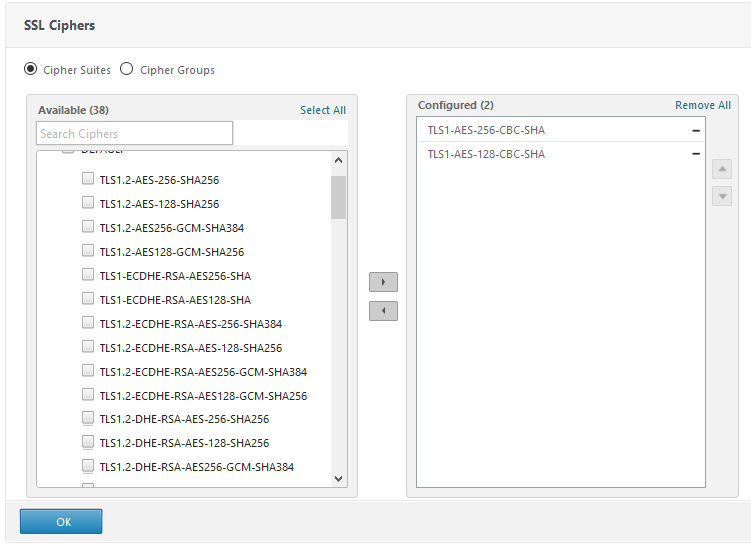
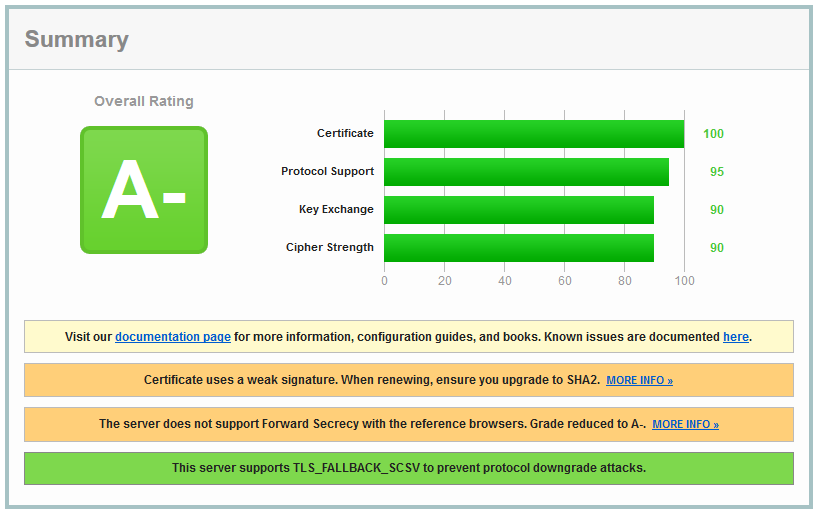
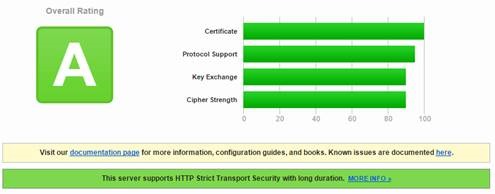
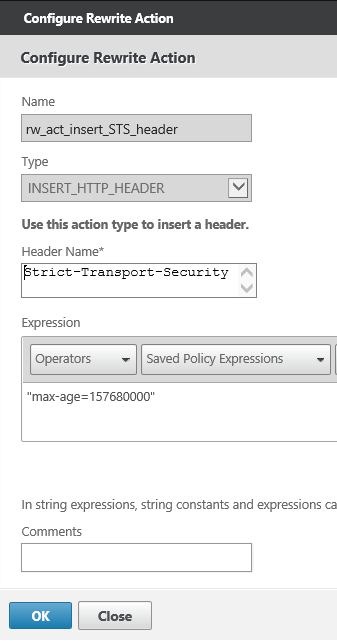
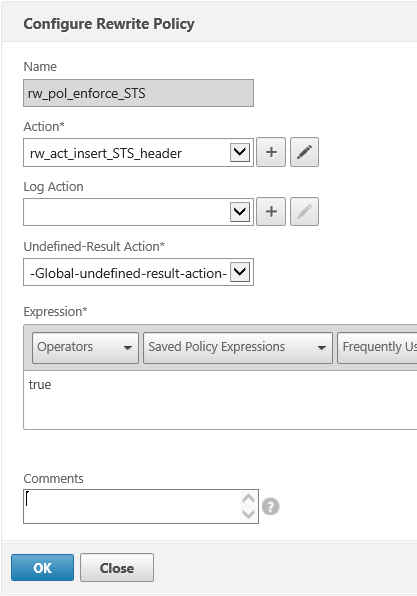
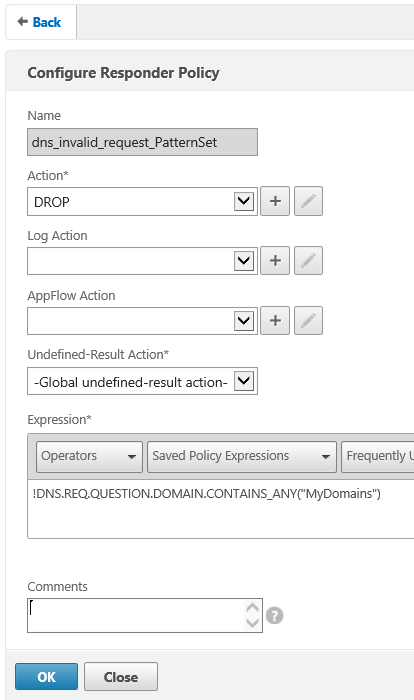
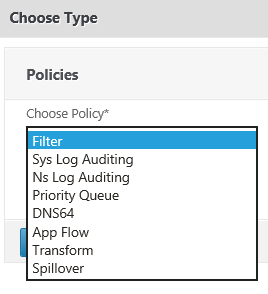
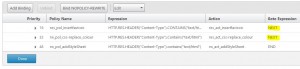
Customizing a 404 message using Citrix NetScaler

$
0
0

Why would you like to customize a 404 page?

Well It’s all about misleading information. A hacker has very limited chance to get friend with your web server. On the other way, he needs to find out as much as any possible. The more he knows, the more likely his attack will be successful. On the other hand he has to let sleeping dogs lie. With other words: He must not alarm you.

One of the most important things to know is: What kind of web server do I have to deal with?

The first source to look into is a HTTP response header called Server. Information here may be very verbose. I don’t know why this header is part of HTML standard, but actually it is.

The Server response-header field contains information about the software used by the origin server to handle the request. The field can contain multiple product tokens (section 3.8) and comments identifying the server and any significant subproducts. The product tokens are listed in order of their significance for identifying the application. (RFC 2616)

This is an example server header:

Apache/1.3.28 (Unix) mod_ssl/2.8.15 OpenSSL/0.9.7c mod_perl/1.27 PHP/4.3

In this case, it’s a very outdated Apache, using an outdated SSL module, outdated Perl and outdated PHP. It’s easy to change this information using Citrix NetScaler rewrite policies (DELETE_HTTP_HEADER and INSERT_HTTP_HEADER).

But hackes are not that stupid. They will probably verify this information. My personal next try would be: check for a non existing site. We will see a 404, page not found. Being careful I would use an existing URL, however do a minor typo, just like http://norz.at/default.html instead of http://norz.at/default.htm. You would probably not be scared if you would see a request like that watching your logs.

The next thing he would see is a 404, Not Found. It will be specific to your server, if you don’t change it. And a 404 page originating from an IIS6  would, for sure, come from an IIS 6, no matter what the server header tells you.

More reasons to change the 404 page

of course there are even more reasons to change the 404 page: customized 404 pages seem to be funny, they may help people to find the content needed, and so on.

Why not change your web server?

This would be possible. However, you would need to change all your load balanced web servers. There is an other reason: Responder policies. I will never return a “401 Unauthorized” or “403 forbidden“. I would rather return a “404 not found”. Being a hacker I would be very excited to see a 401 or 403!

I would think: here it is, but someone protects it from being accessed. But how could I find out what’s going on, if a Citrix NetScaler uses exactly the same 404 page as the original web server? I would probably think the file is not there.

My solution

My first attempt was creating a simple rewriting policy changing the body with something like “HTTP/1.1 404 OK\n\r\n\r<html><head><title>404 File not found</title></tead><body><h1><font color=\”#802020\”>404 File not found!</font></h1><p><font color=\”#802020\”>The file you requested is not on this server.</font></p></body></html>” in it.

The length of the text is limited, so this is not a good solution. And I would rather like to place the file “somewhere” on my web server, so it’s pretty easy to change.

I spent some time thinking what to do and made up my mind to use the HTTP callout feature. It was my first ever attempt to use HTTP callout, and I’ll describe how it works.

NetScaler’s HTTP callout feature

HTTP callout is intended to be used in policies to check something, i.e. an IP address, against a web based service. So I could send an IP address (CLIENT.IP.SRC) to a web server containing an IP black list. This web server then would respond with something indicating good or bad.

I do something completely different: I will retrieve the content of the 404 page from a web server. To do so I have to navigate to App Expert -> HTTP Callouts.

seting a NetScaler HTTP callout

Like any policy it has to get a name. I do my callout to a vServer, so I have to specify the server here. My request will be attribut based, that means, I will be able to send regular HTTP requests, mine is a HTTP GET. My web server uses several host names for various virtual pages, so I have to specify a proper host expression. This makes sure, we retrieve the file from the right source. The URL Stem Expression is the URL we want to retrieve.

We scroll down to the bottom and select the return type TEXT and the expression should be HTTP.RES.BODY(65538). The number is the number of bytes to retrieve.

Citrix NetScaler HTTP Callout

So, my policy will connect to a NetScaler vServer called cs_vsrv_norz.at to retrieve a file called /notfound.htm, setting the header Host to norz.at (i.e: http://norz.at/notfound.htm). It will then return all the body of this file, containing links to style definitions, pictures and so on.

command line version:

add policy httpCallout callout_retrieve_404 -vServer cs_vsrv_norz.at -returnType TEXT -hostExpr "\"norz.at\"" -urlStemExpr "\"/notfound.htm\"" -scheme http -resultExpr "HTTP.RES.BODY(65538)"
set policy httpCallout callout_retrieve_404 -vServer cs_vsrv_norz.at -returnType TEXT -hostExpr "\"norz.at\"" -urlStemExpr "\"/notfound.htm\"" -scheme http -resultExpr "HTTP.RES.BODY(65538)"

The rewrite policy

The rewrite policy should be a very simple thing:

The NetScaler rewrite action using a HTTP callout

NetScaler Rewrite action using HTTP callout

add rewrite action callout404 replace_http_res "SYS.HTTP_CALLOUT(callout_retrieve_404 )"

It’s a replace policy. Expression to choose target location is all of the HTML body, so HTTP.RES.BODY (65536). To be more precise, it’s the first 65536 byte of the body (a 404 page typically is by far smaller). The Expression is the text we will use to replace the former body with. It is the HTTP callout request, in my case SYS.HTTP_CALLOUT(callout_retrieve_404).

The NetScaler rewrite policy

Citrix NetScaler RW policy using HTTP callout

add rewrite policy rw_pol_404 "HTTP.RES.STATUS.EQ(404)" rw_act_404

This policy will get applied if  the HTTP response status is a 404 (HTTP.RES.STATUS.EQ(404)). I then bound this policy to my web server. That’s it. It was pretty easy.

Doing Citrix NetScaler trace (nstrace) inside an admin-partition

$
0
0

I was so enthusiastic, when I found out about NetScaler admin partitions! What a great extension to existing NetScalers! However I got disillusioned finding out about limitations. It took me some time to find out how to overcome this issues, but there are still some features missing.

The feature I missed most is doing traces. It’s not listed in the compatibility list, so it’s intended to be there. But it is not! If you click into System and Diagnostics you’ll see just very little content, and definitely no nstrace (this is about NetScaler versions up to 11.1 48.10).

Citrix documentation is always right, and if it’s not, it’s right even though. So I tried to do a nstrace from commandline. It started and stopped without any problem. Unfortunately I could not find the output of my nstrace in /var/nstrace subdirectory.

So I searched for it, and found it in /var/partitions/<partitionname>/nstrace.

So that’s how I do an nstrace inside a NetScaler admin partition:

I use putty to connect to my NetScaler. Masochists might prefer to use the built in terminal from GUI, however I don’t tend to masochism.

nstrace in an admin partitionswitch partition <partitionname>
start nstrace -filter “CONNECTION.SRCIP.EQ(<source IP>)” -size 0 -time 3600 -link
stop nstrace

So I log into my Citrix NetScaler. I change into my partition (currently partition names can’t auto complete, so make sure you know the name; show ns partition will list all partitions.

Next I start the trace. To do so I follow CTX120941.

start ns trace will simply start the trace. -filter will filter a connection. Usually you would use connection objects like CONNECTION.SRCIP.EQ(<source IP>) or CONNECTION.DSTIP.EQ(<destination IP>) to limit the amount of data captured. -size=<size> will limit the amount of data captured per packet. If you want to debug HTTP problems you would very likely set the size to 0, as this would capture all of the packet (0 sometimes means unlimited). -time=<time> will automatically stop the trace after <time> seconds.

After doing your trace you may execute a stop nstrace command to stop your trace. This is not needed if you set the time parameter, but I prefer to stop traces instead of setting a time parameter.

In the end you need to download the trace file. I usually use winscp as a secure FTP client, download it from /var/partitions/<partitionname>/nstrace and view content in your favourite network monitor. I prefer to use WireShark, as it fully supports NetScaler. Citrix support also uses WireShark.

Additional parameters for tracing

-tcpdump ENABLED switches to TCPdump format. TCPdump is a standard UNIX® format for network tracing. Different to NStrace it does not contain L1 information (ports), but it is understood with most network tracing utilities. You may want to use it together with -perNIC ENABLED if you want to debug routing problems. This will create a separate trace file pre NIC. You then have to scroll down both instances of your network monitor in parallel (and synchronize these 2 windows if you scroll down). However you may prefer to download free WireShark and use it instead as it understands NStrace: one window, all L1 information is contained in your trace.

link Also trace filtered connection’s peer traffic. Only makes sense in combination with -filter. It will trace all traffic filtered plus all traffic resulting from your filtered traffic, so traffic from client to VIP and traffic from SNIP to your back end server. This is a very good one!

-mode SSLplain will decrypt all SSL traffic. Because of this you won’t see any SSL hand shake, instead, all SSL traffic will appear to be plain text. This may be beneficial if you want to debug encrypted traffic. Caution: this may expose sensitive data to you (the admin)

There are several more parameters. You may find them in Citrix NetScaler product documentation.


Trouble shooting Citrix NetScaler Gateway connection issues

$
0
0

One of the most annoying issues in Citrix NetScaler are ICA / HDX connection issues. The reason for this is the way connection issues are reported.

There are two potential sources of trouble: Citrix StoreFront and Citrix NetScaer Gateway. So I will divide my blog in three sections: How to find the source of trouble, Trouble shooting Citrix StoreFront and Trouble shooting Citrix NetScaler Gateway.

How to find the source of trouble

It seems to be annoying and hardly possible. I am one of the moderators of a Facebook group about Citrix. Questions about connection issues come up quite often. Most of the answers don’t focus to the right source. They hardly ever ask: Which component is guilty. Instead people give misleading tips. I want to keep away from misleading tips, instead guide you through a well structured trouble shooting guide.

Let’s try to understand what’s going on:

The stages of a Citrix NetScaler Gateway connection

I talk about using Citrix StoreFront website, there is not so much difference to a receiver for web site. If you still use Citrix WebInterface: not much difference there, but my screen shots won’t be of any help.

  1. a user connects to the NetScaler Gateway website and is prompted with a logon page
  2. the user enters his credentials. This credentials are checked against logon providers like LDAP and RADIUS based sources (Active Directory, RSA, Safe Word, SMS Token and many more).
  3. The user will see applications only after logging on successfully. So logon is done and without any issue as soon as we see applications!
    We now know: NetScaler Gateway was able to authenticate the user, it also connected to Citrix StoreFront (or Web Interface) successfully and StoreFront was successful connecting to XML broker service.
    So no need to check here, it’s already checked: Logon works perfectly fine, the connection to StoreFront / Web Interface worked fine, and it’s connection to XML broker service is tested (we would not see any application if any of them fails)
  4. The user clicks an application. This click is proxied via NetScaler Gateway and StoreFront (WI) to XML broker service. XML broker service selects a resource, a desktop or an application, connects to this resource’s IP vis HTTP(s) (XenDesktop) or IMA (XenApp up to version 6.5), and stores this user’s credentials inside this machine. The machine returns a so called NFuse ticket (NFuse is the old name of Citrix Web Interface). The IP address together with this NFuse ticket is returned to StoreFront (Web Interface).
  5. Getting an STA ticket: This is a first source of problem I want to go into: We have to store the target’s IP address inside our secure environment. The store we use is called STA, and it’s usually one of the XenApp servers or XenDesktop DDCs (desktop delivery controler). The STA returns a so called STA ticket.
  6. We now create an ICA file. The ICA file will contain the name of the NetScaler Gateway (FQDN), the NFuse ticket and the STA ticket (don’t mix these up!) together with some information about screen resolution, clip board mapping and so on. I attached a sample ICA file:
    [ApplicationServers]
    Notepad=
    ...
    [Notepad]
    Address=;40;STA324731891;832A84599E0B7449B8578DCB8DBA95  this is STA ID and STA ticket
    AutologonAllowed=ON
    BrowserProtocol=HTTPonTCP
    CGPSecurityTicket=On
    ClearPassword=E16458A6937769  This is the 1st half of the NFuse ticket
    ...
    Domain=\C48CC641E8301B33  This is the 2nd half of the NFuse ticket
    ...
    InitialProgram=#Notepad
    ...
    Launcher=WI
    ...
    LogonTicket=E16458A6937769C48CC641E8301B33  this is the NFuse ticket
    LogonTicketType=CTXS1
    ...
    SSLProxyHost=gateway.norz.at:443  The FQDN of the NetScaler Gateway used by Receiver
    ...
    TransportDriver=TCP/IP
  7. This ICA file is returned to the client via NetScaler Gateway. We don’t need to consider this connection to be guilty for our problems as it already tested: it worked fine before!
  8. The browser forwards this ICA-File to the Citrix receiver. (Begin of second part!) Citrix receiver will read the ICA file and
  9. connect to the NetScaler Gateway. We can see this as we will see a progress bar.
  10. The receiver will send the STA ticket to the NetScaler Gateway. NetScaler Gateway will connect to the STA and try to resolve this ticket.
  11. As soon an NetScaler Gateway was able to resolve the ticket, NetScaler Gateway will try to connect to the target device (XenApp server, VDI devices)
  12. the application / desktop launches.

It’s essential to understand the connection process you want to trouble shoot!

So, where does it break into parts?

I have already mentioned: as soon as the ICA file is created and returned to the client the second part starts. How can we find out? Easy like that: The Citrix receiver (former names: ICA- client, ICA plugin, Citrix client, and approx 1.742.946 names more) is started, we successfully passed the first stage. So this is my first question: did it download the ICA file?

No,
I did not download an ICA file
so let’s continue trouble shooting Storefront!
Yes
I downloaded an ICA file
so let’s continue trouble shooting NetScaler gateway!

You are not sure if you received an ICA file or not?

  • Firefox: The ICA file goes into your download area, typically %username%\AppData\Local\Temp (or %tmp%). However it usually gets deleted immediately.
  • Internetexplorer: There is a file created in %tmp%, but it is not accessible, it’s extension is not .ICA. However it usually gets deleted immediately.
  • Chrome: It’s the same: the file goes to %TEMP%. Thanks, Hendrik Klinge for this information! It is unchanged, so more or less the same as Firefox.

As the ICA file usually gets deleted immediately you may use Microsoft’s Process Monitor to be 100% sure! You could also edit the ICA file in StoreFront (C:\inetpub\wwwroot\Citrix\Store\App_Data\default.ica). It is a windows INI file. You may change RemoveICAFile=yes to no in [WFClient] section, so it will stay for ever (and spam the %tmp% directory).

More methods to find the stage of the connection process

Usually you will see an error message. It’s stage 1 (StoreFront alone to blame for your issue) if this error message is displayed inside your browser, it’s stage 2 if it’s a windows (Mac, Linux, …) message box.


Trouble shooting Citrix StoreFront

If you got stuck within the first portion of the connection process, your issue is not directly related to NetScaler, you don’t even need to log on to NetScaler!

  1. Log on to your StoreFront server and check NetScaler Gateway settings:
    • Your authentication methods have to contain Pass-Through from NetScaler Gateway (right hand side, lower section, Manage Authentication Methods)

      Pass-Through from NetScaler Gateway

      StoreFront: Pass-Through from NetScaler Gateway

    • You need to define a NetScaler Gateway (right hand side, upper section, Manage NetScaler Gateways)
      Storefront: set a NetScaler Gateway

      Storefront: set a NetScaler Gateway

      Storefront: set a NetScaler Gateway

      Storefront: set a NetScaler Gateway, Detail

      Don’t check authentication settings: Authentication worked fine, so there is nothing to do in here!

    • Also check the STAs. The STAs have to be resolvable! (same dialogue as above)
      STA settings in Citrix StoreFront

      STA settings in Citrix StoreFront

      Use telnet (or putty) to connect to the desired port. So in my example I would do a telnet XD7-DC.norz.local 80. The screen will turn black if it is able to connect. If I enter “something” I will see some HTML output. I won’t see anything if I connect to an https based server: telnet XD7-DC.norz.local 443 as I won’t be able to do a SSL hand shake. If you mistyped the name of the STA, or the STA is not reachable you will see:
      telnet XD7-DC.norz.lokal 443
      connecting to XD7-DC.norz.lokal…
      .
      The connection attempt will time out. Always do this tests from your StoreFront servers!
      Reasons for a STA not being reachable may be a miss-typed STA name or the (application) firewall blocking connections.

    • Enable remote access! (right hand side, lower section, Configure Remote Access Settings).

      Enable remote access in StoreFront

      Enable remote access in StoreFront

  2. There should not be the need to mention, as this is very basic windows administration strategy, however I see tons of people not being aware of it: Check the event log of your StoreFront servers!

Events and their meanings

If something goes wrong in StoreFront you usually see this message:

StoreFront problem

There is something wrong in StoreFront

you will know: We never downloaded an ICA file. We are in trouble with StoreFront. Never check Citrix NetScaler Gateway, it was not involved, check events in StoreFront server. It may be hard to locate an event if you load balance your StoreFront servers, so I tend to disable all services but one.

Events pointing to STA problems:

The events can be found, both in administrative events, or in “Application and Service Logs” -> “Citrix Delivery Services”

There will be a set of events: Citrix Store Service, Error 0, Citrix Store Service, Error 1003, Citrix Store Service, Warning 28.

Citrix Store Service, Error 0, 1003, Warning 28

Events related to STA problems

Citrix Store Service Error 0, Citrix StoreFront: wrong STA name or STA not reachable

Citrix Store Service Error 0

Store Service Error 0: The server name <your server’s name> cannot be resolved. The specified Secure Ticket Authority could not be contacted and has been temporarily removed from the list of active services.

I think, the meaning of this event is more than clear: Citrix StoreFront could not connect to at least one of the STA servers you specified. There might be a chance to connect if there is more than a single STA server. Anyway: You should fix this problem!

Citrix Store Service, Error 1003: No STA server available!

Citrix Store Service, Error 1003 event

Citrix Store Service, Error 1003. All the configured Secure Ticket Authorities failed to respond to this XML transaction: http://<yor server mane>/scripts/ctxsta.dll.

This event will always follow one or more Citrix Store Service, Error 0 events. This is a serious event, it means: It’s absolutely impossible to launch an application or desktop: There is no STA server available. Citrix Store Service, Error 1003 has to be fixed, it’s the reason for your connection problems! No way: You have to fix this problem!

Citrix Store Service, Warning 28

Citrix Store Service, Warning 28: Failed to launch the resource ‘Local.<your application/desktop name>’, unable to obtain a ticket from the configured Secure Ticket Authorities.

This is the final result. We could not launch the application. It’s just a summary, fix Citrix Store Service Error 0 above and you’ll get rid of the 1003 and this one at the same time!


Trouble shooting Citrix NetScaler Gateway

Our problem is related to NetScaler Gateway if we successfully mastered part 1. So let’s trouble shoot problems here.

Citrix Receiver was unable to connect via NetScaler Gateway

Unable to launch an application. Contact your helpdesk with following information: Cannot connect to the Citrix XenApp server. …

Before we see an error like this we will see the progress bar indicating: Citrix Receiver received a STA file. This progress bar is of some interest! Unfortunately this message may disappear way too fast, so you will probably just see the message above.

Citrix receiver launching an application

Citrix receiver launching an application

That’s an absolutely thrilling information for all of you! Click on “more information” and you’ll see where we got stuck!

Citrix receiver connecting to NetScaler Gateway

Citrix receiver connecting to NetScaler Gateway

So this picture shows the receiver establishing a connection to Citrix NetScaler Gateway. To be 100% clear: we still are not connected! We are just establishing a connection to NetScaler Gateway, so a TCP Sync packet is sent, but the TCP/IP connection is either still not established, or the SSL connection is not established yet!

Reasons for connections failing during this stage:

There may be several reasons for connections failing during this stage:

  1. the name of the gateway can’t get resolved. Check the name in StoreFront.
    StoreFront: set a NetScaler Gateway

    Storefront: set a NetScaler Gateway

    Storefront: set a NetScaler Gateway, Detail

  2. The Citrix NetScaler Gateway server certificate is not trusted, or the certificate chain is broken. So as the first step: download NetScaler Gateway’s certificate and open it at your workstation (not in a browser, just from OS). Resolve all problems with this certificate. Don’t even think of continuing without solving this problems, it doesn’t make any sense at all.
  3. If you miss the intermediate CA certificate you have to download it and import it into NetScaler and link it.
    NetScaler 11.1: Go to Traffic Management → SSL → CA Certificates. Import the certificate. Next go to Traffic Management → SSL → Server Certificates. Click the NetScaler Gateway server certificate. Than Action and Link. It should display the certificate of the intermediate CA. Click OK.

STA Tickets

So we successfully connected to Citrix NetScaler Gateway. Connection in progress disappeared. The current state is connected: There is a SSL connection from Client to NetScaler Gateway.

During the next stage the Citrix receiver will send the STA ticket to NetScaler Gateway, and it will try to resolve the STA ticket. To do so it has to connect the configured STA.

STAs don’t replicate (actually they don’t even know about each other), so we need to specify exactly the same STA to NetScaler Gateway as we did in StoreFront. We will have to check StoreFront for STAs (see here). We then will check Citrix NetScaler Gateway for STA settings.

We navigate to NetScaler Gateway → Global Settings:

Seting STA in NetScaler Gateway

Seting STAs in Citrix NetScaler Gateway

NetScaler Gateway: STA down, no connection possible

NetScaler Gateway: all STAs are down, so no connection possible

As you see: the bound STA appears to be down. There are 3 reasons for this:

  1. the name is wrong, or can’t get resolved. I would put the name into clipboard and then navigate to System → Diagnostics and start the ping utility. Paste the host name into clipboard and see if it is ping-able. You will see, at least, if the host name is resolvable
  2. the host name is not resolvable. So the DNS server you configured for your NetScaler gateway is unable to resolve the host name. In both cases the result of this ping will look like that:

    NetScaler Gateway: STA hostname not resolvable

    NetScaler Gateway: STA host name not resolvable

  3. a firewall is blocking the STA communication.

After resolving all of these issues the STA settings in NetScaler Gateway should look like this:

NetScaler Gateway: All STA servers are up now

All STA servers are up now

You will notice the STA IDs, indicating NetScaler Gateway could connect to this STA at least once, and the green light (it may be missing with some elder versions of NetScaler) indicates actual connections.

No more problems about NetScaler Gateway and StoreFront as soon as you are fine until here!

It takes too much time to establish connections from outside, compared to inside?

Don’t blame NetScaler for this:

So NetScaler knows where to connect. NetScaler will use TCP/2598 for this connection: CGP (Citrix Gateway Protocol, former name: Common Gateway Protocol). At least as long as you did not turn off session reliability. I bet my life, you did not. NetScaler Gateway will try to connect via CGP for 30 seconds, than give up and try plain HDX (formerly known as ICA) on TCP/1494. So open up TCP/2598 on your firewall, it will safe you 30 valuable seconds!

Your connections still fail?

Let’s keep thinking: we successfully connected to NetScaler Gateway. We successfully resolved the ticket, so NetScaler Gateway now connects to the target device: a Citrix XenApp server or a Citrix XenDesktop VDI device.

So there are 2 reasons for this issue:

  1. a firewall blocks the connection
  2. NetScaler Gateway does not know a route to this IP

Just resolve these issues by opening up the firewall ports, or add the route to the desired network.


I hope this helped! Feel free to ask if you see additional problems not covered in here, I’ll answer your question and add the solution here.

Unfortunately I was unable to capture screen shots from Citrix Receiver connection stages due to my (relatively) fast environment. I’d be glad to get your screen shots 😉

Redirecting a user to a SSL page (preserving the URL)

$
0
0

I’m just setting up a Web Application Firewall on a Citrix NetScaler 11.1 for a costumer’s shop. My costumer mandated: most of the website has to be available via HTTP. However we don’t want to expose sensitive information to the internet, so we had to create a policy redirecting users to SSL when ever needed.

So how can we do this? First of all I had to find out: which information is sensitive? It takes some time, you have to explore the application (basically a web shop).

Next: how to redirect to SSL, and thereby preserve the URL?

The policy expression

The policy has to be flexible. I want to be able to redirect users from where ever to the same URL via https. So my policy has to be a responder policy. Subtype: redirect.

add responder action res_act_send2ssl redirect 
   "\"https://\"+HTTP.REQ.HOSTNAME + HTTP.REQ.URL.HTTP_URL_SAFE" 
   -responseStatusCode 302

Rather trivial.

redirecting a request to SSL using Citrix NetScaler responder policies, GUI version

the GUI version

What does it do? It redirects to "https://", appends the server name specified (HTTP.REQ.HOSTNAME). If there is just one host name you could rather do something like "https://hostname.exampe.com". Next it appends the URL (HTTP.REQ.URL). The parameter HTTP_URL_SAFE is not needed. It converts all URLs into save URLs, so for examlpe /logon Page is converted into /logon%20Page. It’s good practice to do so.

Last not least: the HTML status code: I’m usually very exact about html status codes: 302 is a temporary redirect, while 301 is a permanent redirect. There is no difference from perspective of a browser: the browser will redirect. However crawlers, like Google™, will make a big difference: it will follow a 301 (and delete the previous content from it’s index), it might not follow a 302 (as it is only a temporary redirect and will be gone soon). In this case we didn’t want crawlers to follow, so we stayed with 302, the Citrix NetScaler default.

The policy

My policy had to be flexible. One of the requirements: We need to add URLs to it, when we come across a new URL. So I came up with the idea to use a Pattern Set.

Pattern Set

I prefer string maps over expression1 || expression2 || ... || expressionn constructions for several reasons: It’s more effective from perspective of NetScaler RAM and CPU (so it causes less load to NetScalers), and even more important, it’s easier to understand, and it’s easier to maintain. Just add an other URL to the Pattern Set.

add policy patset WebApp_secureURLs
bind policy patset WebApp_secureURLs "/login" -index 1
...
Citrix NetScaler: Creating a patternset

the Pattern Set

so this will create a Patern Set, containing URLs. This URLs will be used in the policy expression. You’ll simply have to add URLs if you needSSL for additional URLs

The Policy expression, using a pattern set

add responder policy res_pol_send2ssl 
   "HTTP.REQ.URL.CONTAINS_ANY(\"WebApp_secureURLs\")" res_act_send2SSL
Citrix NetScaler responder policy: sending to SSL using a pattern set

The responder policy

This will create a policy expression using a pattern set. HTTP.REQ.URL us the URL (not containing the host name), CONTAINS_ANY means, the URL has to contain any of the objects inside my pattern set. We could also use EQUALS_ANY or ENDSWITH_ANY. It depends on, weather you are able to specify the URL exact enough or not (we can’t). (\"WebApp_secureURLs\") specifies the pattern set to be used. The double quotes " have to be masked with \" in command line as policy expressions have to be set in double quotes (" ... ").

Setting up StoreFront 3.0 for NetScaler 11

$
0
0

As soon as our NetScaler Gateway is up and running we need to set up StoreFront to use it. It’s more a kind of introducing the NetScaler Gateway to StoreFront. Other than WebInterface StoreFront is designed to use a NetScaler Gateway, so it’s a rather easy thing to do.

Enabling Pass-Through authentication from NetScaler Gateway

We open up StoreFront management console and click Authentication and select Add/Remove Methods on the right side.

SF_NG_Auth

We need to enable Pass-Through from NetScaler Gateway authentication. We can’t continue if we don’t!

Adding a NetScaler

Next step will be introducing our NetScaler to StoreFront, so it may be used by stores for remote access.

In StoreFront management console and click NetScaler Gateway and select Add NetScaler Gateway Appliance on the right side. A wizard opens.

SF_NG_introduce-NG

  • The name of our NetScaler Gateway is used in StoreFront only. You may choose the name you like best. Keep away from too funny or offending names, your boss may eventually see it 😉
  • We add the FQDN of our NetScaler Gateway (it’s important to use the FQDN, exactly the same spelling as used on our certificate, or our HDX session will fail to launch!)
  • The Subnet IP (SNIP) of your NetScaler Gateway. This is optional. You should not turn it on (following this post)
  • Logon type is usually Domain. We have strong authentication on NetScaler Gateway, so we don’t need 2 factor authentication on StoreFront. Domain credentials get passed from NetScaler Gateway to StoreFront, so users won’t have to add their credentials twice.
  • The Callback URL is an other optional parameter: the FQDN of the NetScaler Gateway. Again no point in skipping it. StoreFront contacts the NetScaler Gateway authentication service to verify that requests received from NetScaler Gateway. It’s mandatory if you use endpoint analysis scans on your Gateway and want to utilize these results in XenApp / XenDesktop to filter policies (“Citrix Smart Access”), as scann results are fetched from NetScaler Gateway during call back. It’s also used for session reliability.
    It may be difficult to connect from StoreFront to NetScaler Gateway. There is a Citrix White paper about it. It’s quite old but still valid.

Click Next

On next screen we have to set up STAs. The STA is a service inside the XML broker service and used to store the IP addresses of servers that will host the user’s session. It’s mandatory to have STAs for ICA proxy.

The XML broker service is located on every XenDesktop controller and every XenApp server for XenApp versions up to 6.5, so it’s nothing we have to install.

We have to use the same STAs in NetScaler Gateway, or we will run into trouble during the connection phase.

SF_NG_introduce-STA

  • We have to add STA servers. Citrix tends to encrypt all traffic using SSL, that’s why they suggest using SSL. In my opinion there is no serious content flowing too and from STA (just user name, application launched, the IP of the server responsible for this application too and a 32 byte random number, the STA ticket, back), so we don’t necessarily need to use SSL here.
    Of course we should use two STAs as one of them may become unavailable and the other one will take over.
    We should not load balance STAs (it would be possible here, but you must not do this on NetScaler Gateway or our sessions won’t launch!). So let’s just add two or more of our controllers here, they get load balanced by StoreFront servers. I always add the most preferred data collector here and one or more of the preferred ones in XenApp 6.5 or previous versions.
  • If we want to use session reliability we need to check this check box. Doing so will cause our STA tickets to remain inside the STA as long as our session lasts. Our client will be able to reconnect because of this.
  • Using two STAs at the same time will avoid reconnection issues if the original STA server is currently down during reconnection attempts. It’s not mandatory, however may be a benefit and is of hardly any costs (STA tables get longer, so it’s a bit of waist of RAM on controllers, we are talking about MBs, no GBs).

Click Create to finish.

Enabling remote access

Our Storefront server now knows about our NetScaler Gateway. We just have to allow our store to use it. An easy one to do:

In StoreFront management console and click Stores, highlight one of your stores (or your store if there is just one) and select Enable Remote Access on the right side. A wizard opens.

SF_NG_EnableRemoteAccess

  • Remote access should not use a Full VPN tunnel (this would not be HDX proxy mode or so called “micro VPN” but full VPN access!) but No VPN tunnel. If you want to use a full VPN you don’t have to do anything within StoreFront as this is local LAN access as soon as you are connected to your VPN. However you would have to roll out VPN clients and VPNs are considered to be less secure than HDX proxy.
  • Select your NetScaler Gateway.

Click Okay to finish.

Managing beacons

A beacon is an intentionally conspicuous device designed to attract attention to a specific location (Wikipedia).

We use our beacons to decide if our client is inside our LAN or on the internet. This will allow mobile clients to roam from extern to intern and vice versa without the need of reconfiguration. It only works with Citrix Receiver, it won’t work if you use a browser.

Citrix receiver will immediately try to connect to internal and external beacons if it gets started.

  • If our client is inside of our LAN (so it can connect to the internal beacon, we don’t care about external ones) we will skip the NetScaler Gateway and directly connect to StoreFront. We will use one of StoreFront’s authentication methods (instead of NetScaler authentication) such as one factor domain authentication or domain pass-through authentication. Our Citrix Receiver will directly connect to the designated remote session host or virtual desktop.
  • If the client is on the internet (so it can not connect to the internal, but to at least one of our external beacons) we will connect to NetScaler Gateway.
  • If none of the beacons may get reached our client won’t try to connect and the user will see an error message if he tries to launch an application.

SF_NG_Beacons

  • Internal beacon: It defaults to Use the service URL. This is the base URL displayed (and managed) in StoreFront management console (click Server Group to see it).
    The receiver will just do a HTTP (HTTPS) connection there (it will send a HEAD / command). You will have to change it if there is a HTTP service available on the internet for this URL. Specify a different beacon address in case.
  • There is no guide line for Extrenal beacons. They default to your NetScaler Gateway and http://www.citrix.com. You may use which ever web servers you like. Select highly available ones!

Reading matter for a Citrix Pro

$
0
0

This is multi langage: a mix of German and English. Look for the flag you prefer ..

German contentKürzlich haben mich Kollegen gefragt, welche Bücher es im Citrix Umfeld gibt. Ich persönlich gehe lieber in einen Kurs, als dass ich Bücher lese, aber Kurse sind teurer, und nicht jeder lernt auf diese Art gleich gut.

Ich besitze naturgemäß einige XenApp und XenDesktop- Bücher, nicht alle sind gleich gut. Ich habe einige ausgesucht, die ich für Lesenswert halte.

Leider sind Bücher zumeist bereits überholt, wenn sie erscheinen. Citrix veröffentlicht vierteljährlich neue Produktversionen. Wenn ein Buch abgeschlossen ist dauert es in der Regel 6 bis 12 Monate, bis es gekauft werden kann. Daher werden Bücher jeweils für die LTSR (Long Time Service Reliese) Versionen geschrieben.

English content I had recently been asked by colleges about reading matter. I personally prefer classes over reading, but people are different. I own several XenApp/XenDesktop, NetScaler and XenMobile books. I don’t like all of them, so I picked up some I liked and show them here.

It’s a matter of fact: Books tend to be outdated the day they appear on the market. There is steady development, Citrix brings new versions of it’s products every 3-6 month, while it takes 6-12 month to produce a book (I don’t talk about writing, I talk about production). So books tend to have reference to LTSRs (long time service releases)

Citrix NetScaler

There are some cool NetScaler books out there.

English content Troubleshooting NetScaler by Raghu Varma Tirumalaraju is a classic one. Raghu Varma Tirumalaraju is a Citrix employee, based in France. This book maybe not focuses on beginners, but experts will find it worth while reading. It’s the most complete one out there. The current version of this book was published on 4/16 and is based on late v.10.5 versions.

English content Mastering NetScaler VPX by Rick Roetenberg and Marius Sandbu, published in November 2015. Rick and Marius are Dutch Citrix Gurus. The title is a bit miss-leading, as it also perfectly suits for NetScaler MPX and SDX as all NetScaler versions share the same code base (the SPX specific part, so SDX VM management, is missing). It’s a bit lower level, but easier to read.

English content Implementing NetScaler VPX by Marius Sandbu, published in Oktober 2015, is a classic one. I personally would prefer Mastering NetScaler VPX. Be sure to get the second edition, first edition is elder.

XenApp / XenDesktop

English content Inside Citrix: The FlexCast Management Architecture Bas van Kaam printed in 5/16 is a bible about XenDesktop 7.6 (the LTSR). It’s currently the latest book on the market. Again, this is not a book for newbies, but it will be what you’re looking for if you are a XenDesktop pro!

German content Citrix XenDesktop 7.5 und XenApp: Das Praxishandbuch für Administratoren von Nico Lüdemann ist der Klassiker, und das Original ist in Deutsch! Vielleicht das ideale Buch für den Einsteiger, und das einzige, das ich mir auf Deutsch antun würde! Es gibt auch eine Version für XenApp 6

Unfortunately, Nico Luedemann’s book about XenDesktop 7.5is currently not avalable in English.

XenMobile

German content Citrix XenMobile 10: Installation, Konfiguration, Administration von Thomas Krampe wäre mein erster Tipp! Wieder ein Buch, das man jedenfalls auf Deutsch lesen sollte! Ich hatte meine XenMobile Installation binnen kürzester Zeit am Laufen! Einfach, klar, gut geschrieben!

It’s all cloudy, now ;-)

$
0
0

Citrix had been cloud computing ever since. In fact, Citrix started doing professional Cloud Computing in 1995. They improved their private cloud approach in 2002 by launching Secure Gateway (and all it’s successors). They already did cloud computing when no one even knew about cloud computing. Maybe Citrix is the cloudiest company on the globe.

Citrix dramatically improved their product over time. A big step forward was FMA. Maybe some of you don’t really like FMA, but I think it’s great. But there is one drawback about FMA: it’s expensive.

With IMA you could create a single remote desktop server and add Citrix XenApp to it. That’s it. No data base needed, a single MDB file will do. Install your web interface on the same box, finished! Add a second remote desktop server, including web interface, and you have, what I’d consider to be a farm; with full redundancy. OK, management is not possible as long as the server, containing the data store, is down.

FMA is different: There is a strict separation between back-end and front-end components. Even though I do know it’s possible to install all components on one box, I would strongly advice to keep them separated.

Back-end components:

There are three mandatory components: Data base, controllers (also called desktop delivery controllers, names change frequently) and StoreFront. (Plus license servers, …)

The data base had to be redundant as it was essential to the farm. You could not launch a single application as long as the data base was down. This was mitigated when Citrix introduced connection leasing, but a stable data base still is mandatory.

Controllers are essential too: same here, you can’t launch an application as soon as all controllers are down. Same is about StoreFront.

So a fully redundant XenDesktop / XenApp 7.x deployment consists of three (!) data base servers (one of them, the witness server, may be SQL Express), two controllers and two StoreFront servers. A “somewhat stable” deployment for a small company consists of, at least, a data base server, and two boxes containing controller and StoreFront functionality, so three servers.

Front-end components:

These may be Remote Desktop Servers or virtual PCs. I call these: workers. They may run on bare metal as same as on any hypervisor you like (as long as it’s VMWare, HyperV, Xen, Amazon Web Services, Microsoft Azure and many more). I won’t go into in this. They pay themselves as they do real work.

So let’s go back to the back-end components.

They are some kind of a set it and forget it infrastructure. If you look a bit deeper into these, there is some important work for an admin: data base backup (including regular restore tests!), frequent updates (as Citrix releases a new version every 3 to 6 month) and some more.

Did you ever think: why do I need to keep all these costly components? Bet your life: I thought of getting rid of them several times. But moving all of my (my costumer’s) environment into the cloud is no option in many cases, so I have to keep them on premise.

Let’s think a bit about it: Why? That’s easy: data is mandated to be on premise, so back-end components need to be on prem as well. Right?

Wrong!

Citrix now offers Citrix Cloud services. Maybe you think: just another f***ing cloud provider? No. That’s definitely wrong. Citrix does not run any cloud services at all, instead they host on Microsoft Azure. And Citrix does not want host your workers, they never will. Instead they offer all necessary back-end components. Fully redundant, perfectly sized, updated continuously, including Citrix licenses.

I have been on a sales workshop by Fabian Kinle yesterday. Fabian is a hero of German, of European Citrix sales. Yesterday he wanted to sell Citrix Cloud Services. And he asked: Would you sell Citrix Cloud Services to your costumers. “I would not do” I replied. Fabian didn’t like this on first sight. “But I would guide my costumers all the way through a XenApp / XenDesktop project. In the end, we would decide where to host all these back-end components. Citrix cloud services is, indeed, a very sexy option: I can get rid of all these back-end components and focus to the front-end. From perspective of a consultant this is sexy, as back-end components just cause trouble, but don’t bring much revenue. From perspective of the costumer, it’s pretty much the same.” Fabian started smiling again.

Yes, I would think of that. I would think of that for a rather small environment (since licensing now starts from 25 users), as I get full redundancy for rather little cost. I would consider using it for huge costumers as well, as Citrix will be responsible for all the life cycle management, like scaling it up to a proper size and updates. Your back-end components will always be shiny and fine. Being the architect, I would also like it, as sizing back-end components is my peace of cake no more.

And being the CFO? Hey, I don’t have to buy hardware and licenses and then pay for a year by year subscription, instead, I will rent. It adds flexibility as I can add or remove licenses whenever needed. Don’t forget: after reducing stuff you will still have to pay subscriptions for now no more needed licenses as further growth may bring users back.

Citrix also tries to keep your workers as independent as any possible from cloud providers. They will release tools to help you moving your workers. From premise to cloud, even better, they’ll help you moving from AWS to Azurre (that’s obvious), the other way round (that may be a bit of surprise), or even from cloud to premise (even though no one nowadays may think of this). They don’t care where you host, they’ll help you as long as you use their product.

There is something they care about: Keeping you environment up to date. Maybe even more: They keep their own environment (so your hosted StoreFront, controllers) one step ahead of retail versions. This does not mean you have to update your VDAs on a daily base: there is a broad range of backward compatibility. Just update your part of the site (farm), when ever you feel like updating. Update it, when ever you see a benefit.

The rest is simple maths. Are costs nice, just fair or even insane? That’s your job to do.

Viewing all 57 articles
Browse latest View live